User Guide
Welcome to JobFindr!
Find Your Success with JobFindr

Table of Contents
- Introduction
- Quick Start
- Quick Tutorial
- Key Information
- Features
- FAQ
- Glossary
Introduction
Are you an NUS Fresh Graduate looking for a job? Are you struggling to use a spreadsheet to keep track of your job applications? Are you looking for a better way to manage your job applications? Well, look no further as JobFindr is here to help you!
JobFindr is a Desktop-based Job Application Management App for NUS Fresh Graduates to record, track and organise their job applications.
JobFindr aims to simplify your job application management by targeting the following benefits:
- Flexibility in adding, deleting and editing job applications and interviews.
- Efficiency in finding the specific application with minimal keywords.
- Organisation in sorting the list of applications to not miss out on key opportunities.
JobFindr combines the rapid efficiency of Command Line Interface (CLI) with the visual clarity of Graphical User Interface (GUI), offering job application management that is suited for your specific needs and preferences.
Navigating the User Guide
Welcome to the JobFindr User Guide! This document is your key to unlocking all the features and capabilities of JobFindr. To enhance your understanding and usage of this tool, we have included a variety of annotations throughout this guide. Here’s what they mean:
![]() Useful Tips:
Useful Tips:
- These are practical suggestions to enhance your JobFindr experience.
- Implement these tips for an efficient and effective job search journey.
![]() Warning:
Warning:
- Pay close attention to these sections.
- They highlight important limitations and common pitfalls in using JobFindr, ensuring you avoid any unnecessary issues.
![]() Notes:
Notes:
- Dive deeper into the functionalities of JobFindr with these informative notes.
- They provide expanded insights and additional context, empowering you to leverage JobFindr to its fullest potential.
Additionally, you’ll encounter different text styles within this guide:
- Hyperlinks: Easily identifiable, these links lead you to other relevant sections of the guide or to external websites for more information.
-
Code Text: Highlighted text that can likely be keyed into the command box or to your computer.
First Time using JobFindr
Welcome aboard! We’re delighted to be part of your job search journey!
- To get started with JobFindr, refer to the Quick Start below.
- After setting up JobFindr on your computer, you can get started with a Quick Tutorial to get familiar with the features.
- You may also explore JobFindr at your own pace. You can refer to the Feature section for all of JobFindr’s features.
If you have any questions or face challenges, our FAQ Section has solutions to common queries. Let’s make your JobFindr experience seamless and successful!
Returning JobFindr User
Good to have you back! We’re thrilled to have you with us again. How can we help you?
- Facing problem with specific command?
- You may refer to the detailed instruction for each command in the Features section or find direct links in our Table of Contents.
- Forgot the commands available on JobFindr?
- You may refer to the Command Summary for a quick refresher of what you can do on JobFindr.
- Encountering any other challenges during your JobFindr journey?
- You may refer to the FAQ Section for solutions to common issues faced by our users.
Quick Start
We are excited to have you on board! Let us help you get started with JobFindr in a few simple steps. You will need to have some basic knowledge of terminal commands. You can learn how to use the terminal with this guide.
-
Ensure you have Java 11 or above installed in your computer.
- Download the latest
JobFindr.jarfrom here.
- Copy the file to the folder you want to use as the home folder for your ApplicationBook.
-
Open a command terminal,
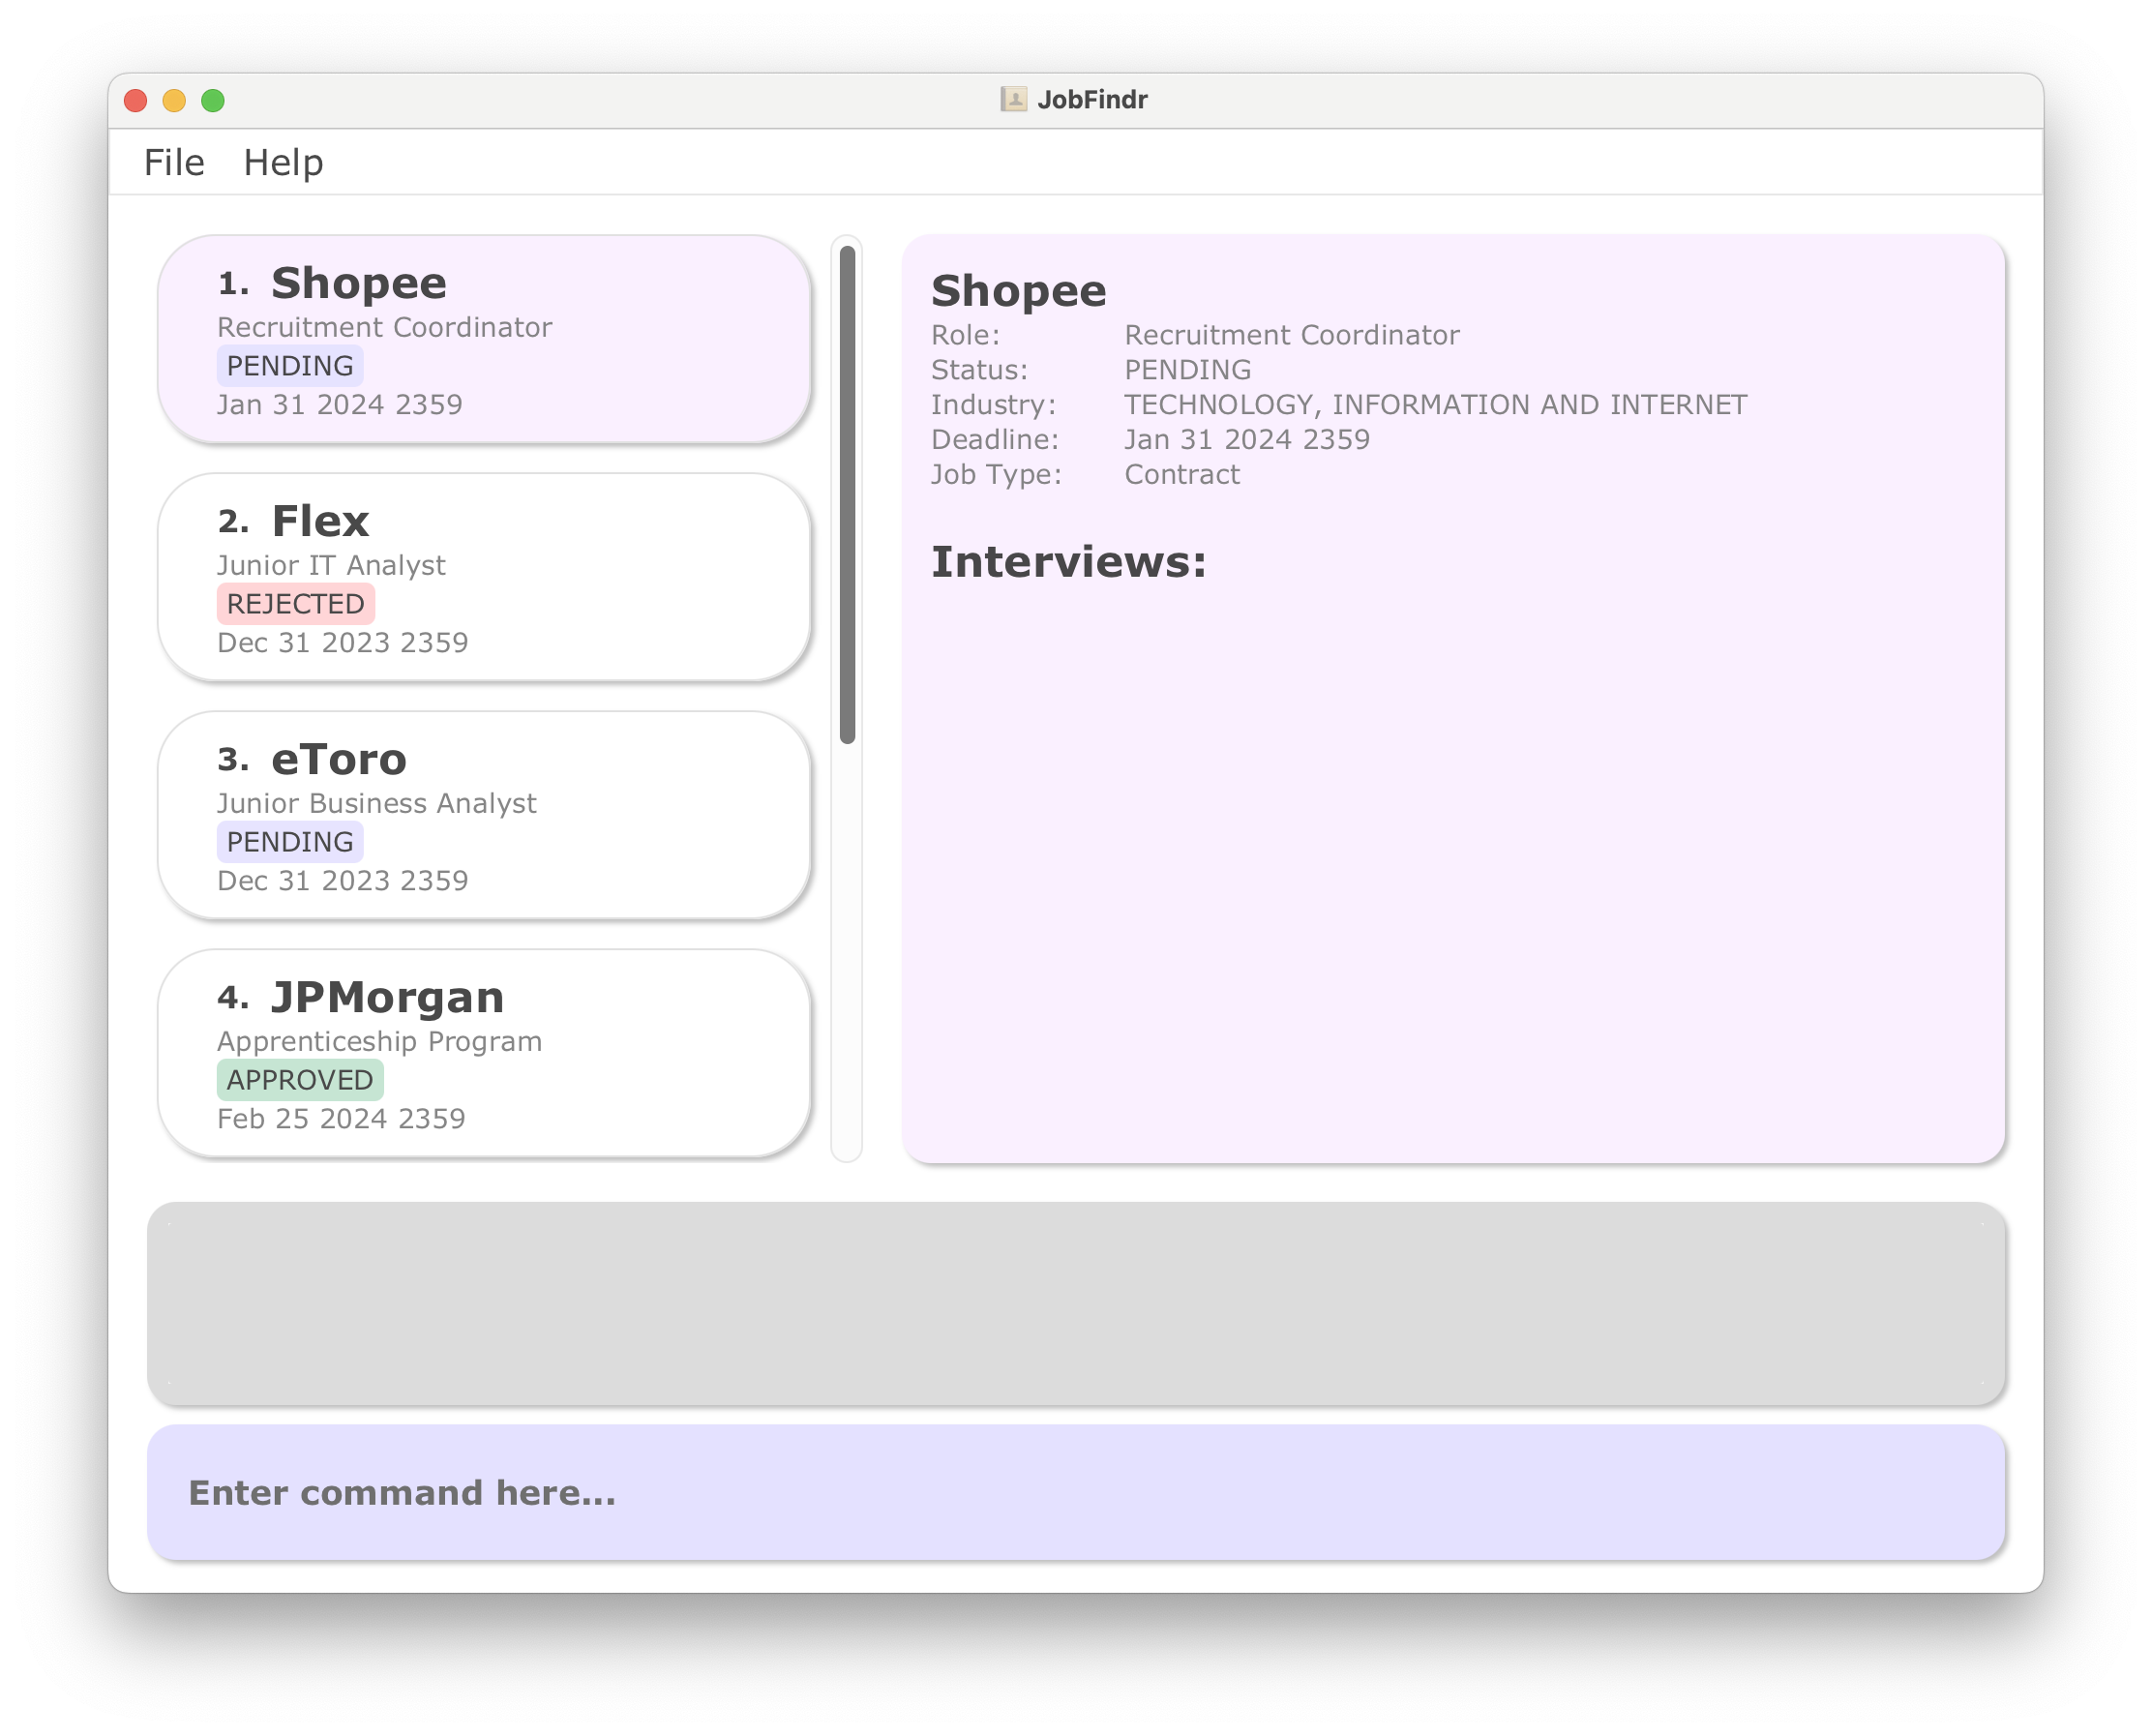
cdinto the folder you put the jar file in, and enter the commandjava -jar JobFindr.jarto run the application. - A GUI similar to the below should appear in a few seconds. Note that the app contains some sample data.
- Get started on JobFindr with our guided Quick Tutorial to learn the basics of using JobFindr in a few minutes.
- Refer to Key Information below for details of each command.
Quick Tutorial
Let us help you begin your job search journey with JobFindr. Here is a quick tutorial to help you understand the basic features to get started on JobFindr. You may skip the steps labelled as [Optional].
- Add your first job application on JobFindr
- Edit a field in the newly added application
- Delete the application
1. Add your first job application on JobFindr
Maximise your flexibility by adding applications with just the essential fields. Now, let us try to add an application in JobFindr.
Step 1: Find the Command Box on JobFindr and type in add c/Google r/Software Engineer before
pressing Enter.
- Learn more about the structure of a job application here.

![]() Notes:
Notes:
- Learn more about the structure of a job application here.
Step 2: You should see a new entry added to the job list just like this:
- You may need to scroll down the list to view the new entry by using the scroll bar.
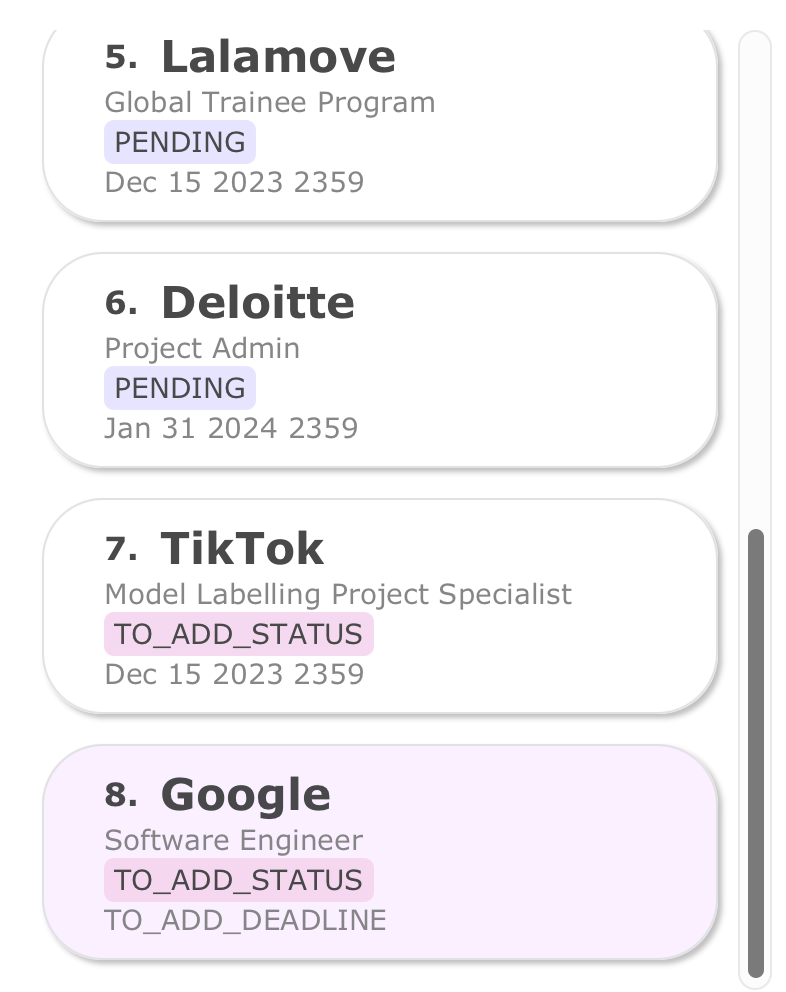
[Optional] Good job! You have added your first application onto JobFindr! Now, you may try out adding other applications with different field inputs. Try entering or copying the following into the Command Box:
add c/Apple r/iOS Engineer d/Jan 02 2024 2359add c/Facebook r/Product Manager d/Jan 04 2023 1200 s/Pendingadd c/Microsoft r/Project Manager d/Dec 31 2023 1400 i/Technology s/Pending t/FULL_TIME
2. Edit a field in the newly added application
Now that you have learnt how to add applications in JobFindr, let’s explore how to edit or update a specific field in the newly added application!
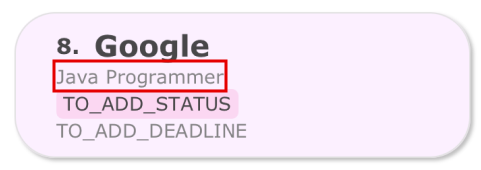
Step 1: Find the index of the application you want to edit. Let’s edit our newly added
Google application for now.
- You may want to enter the
listcommand to list all available applications.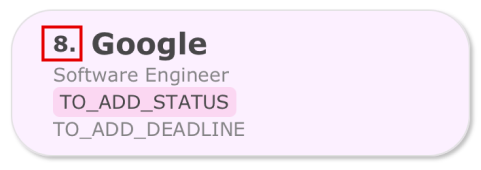
Step 2: Type edit 8 r/Java Programmer into the Command Box and press Enter. You should see an update to the
application’s role.
[Optional] Great! You have now edited the role field in your application. Try editing other fields by entering the
following commands:
edit 8 s/PENDINGedit 8 d/Dec 02 2023 2359
3. Delete the application
What if the application is no longer relevant to you? Can we delete the application from our app? Of course! Let’s try deleting the application we have just added.
Step 1: Find the index of the application you want to edit. Let’s edit our newly added
application to Google for now.
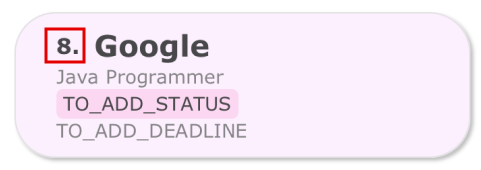
- You may want to enter the
listcommand to list all available applications.
Step 2: Type delete 8 into the Command Box and press Enter. You should notice that the application will be
removed from the list of applications.
Congrats! You have now master the basics of JobFindr! You may head below to learn more about JobFindr in details or go on to learn about the other commands you can utilise in JobFindr.
Key Information
User Interface
We designed our Graphical User Interface(GUI) with both functionality and visual appeal in mind, to provide a seamless experience for you at JobFindr.
Below are the components of our GUI:
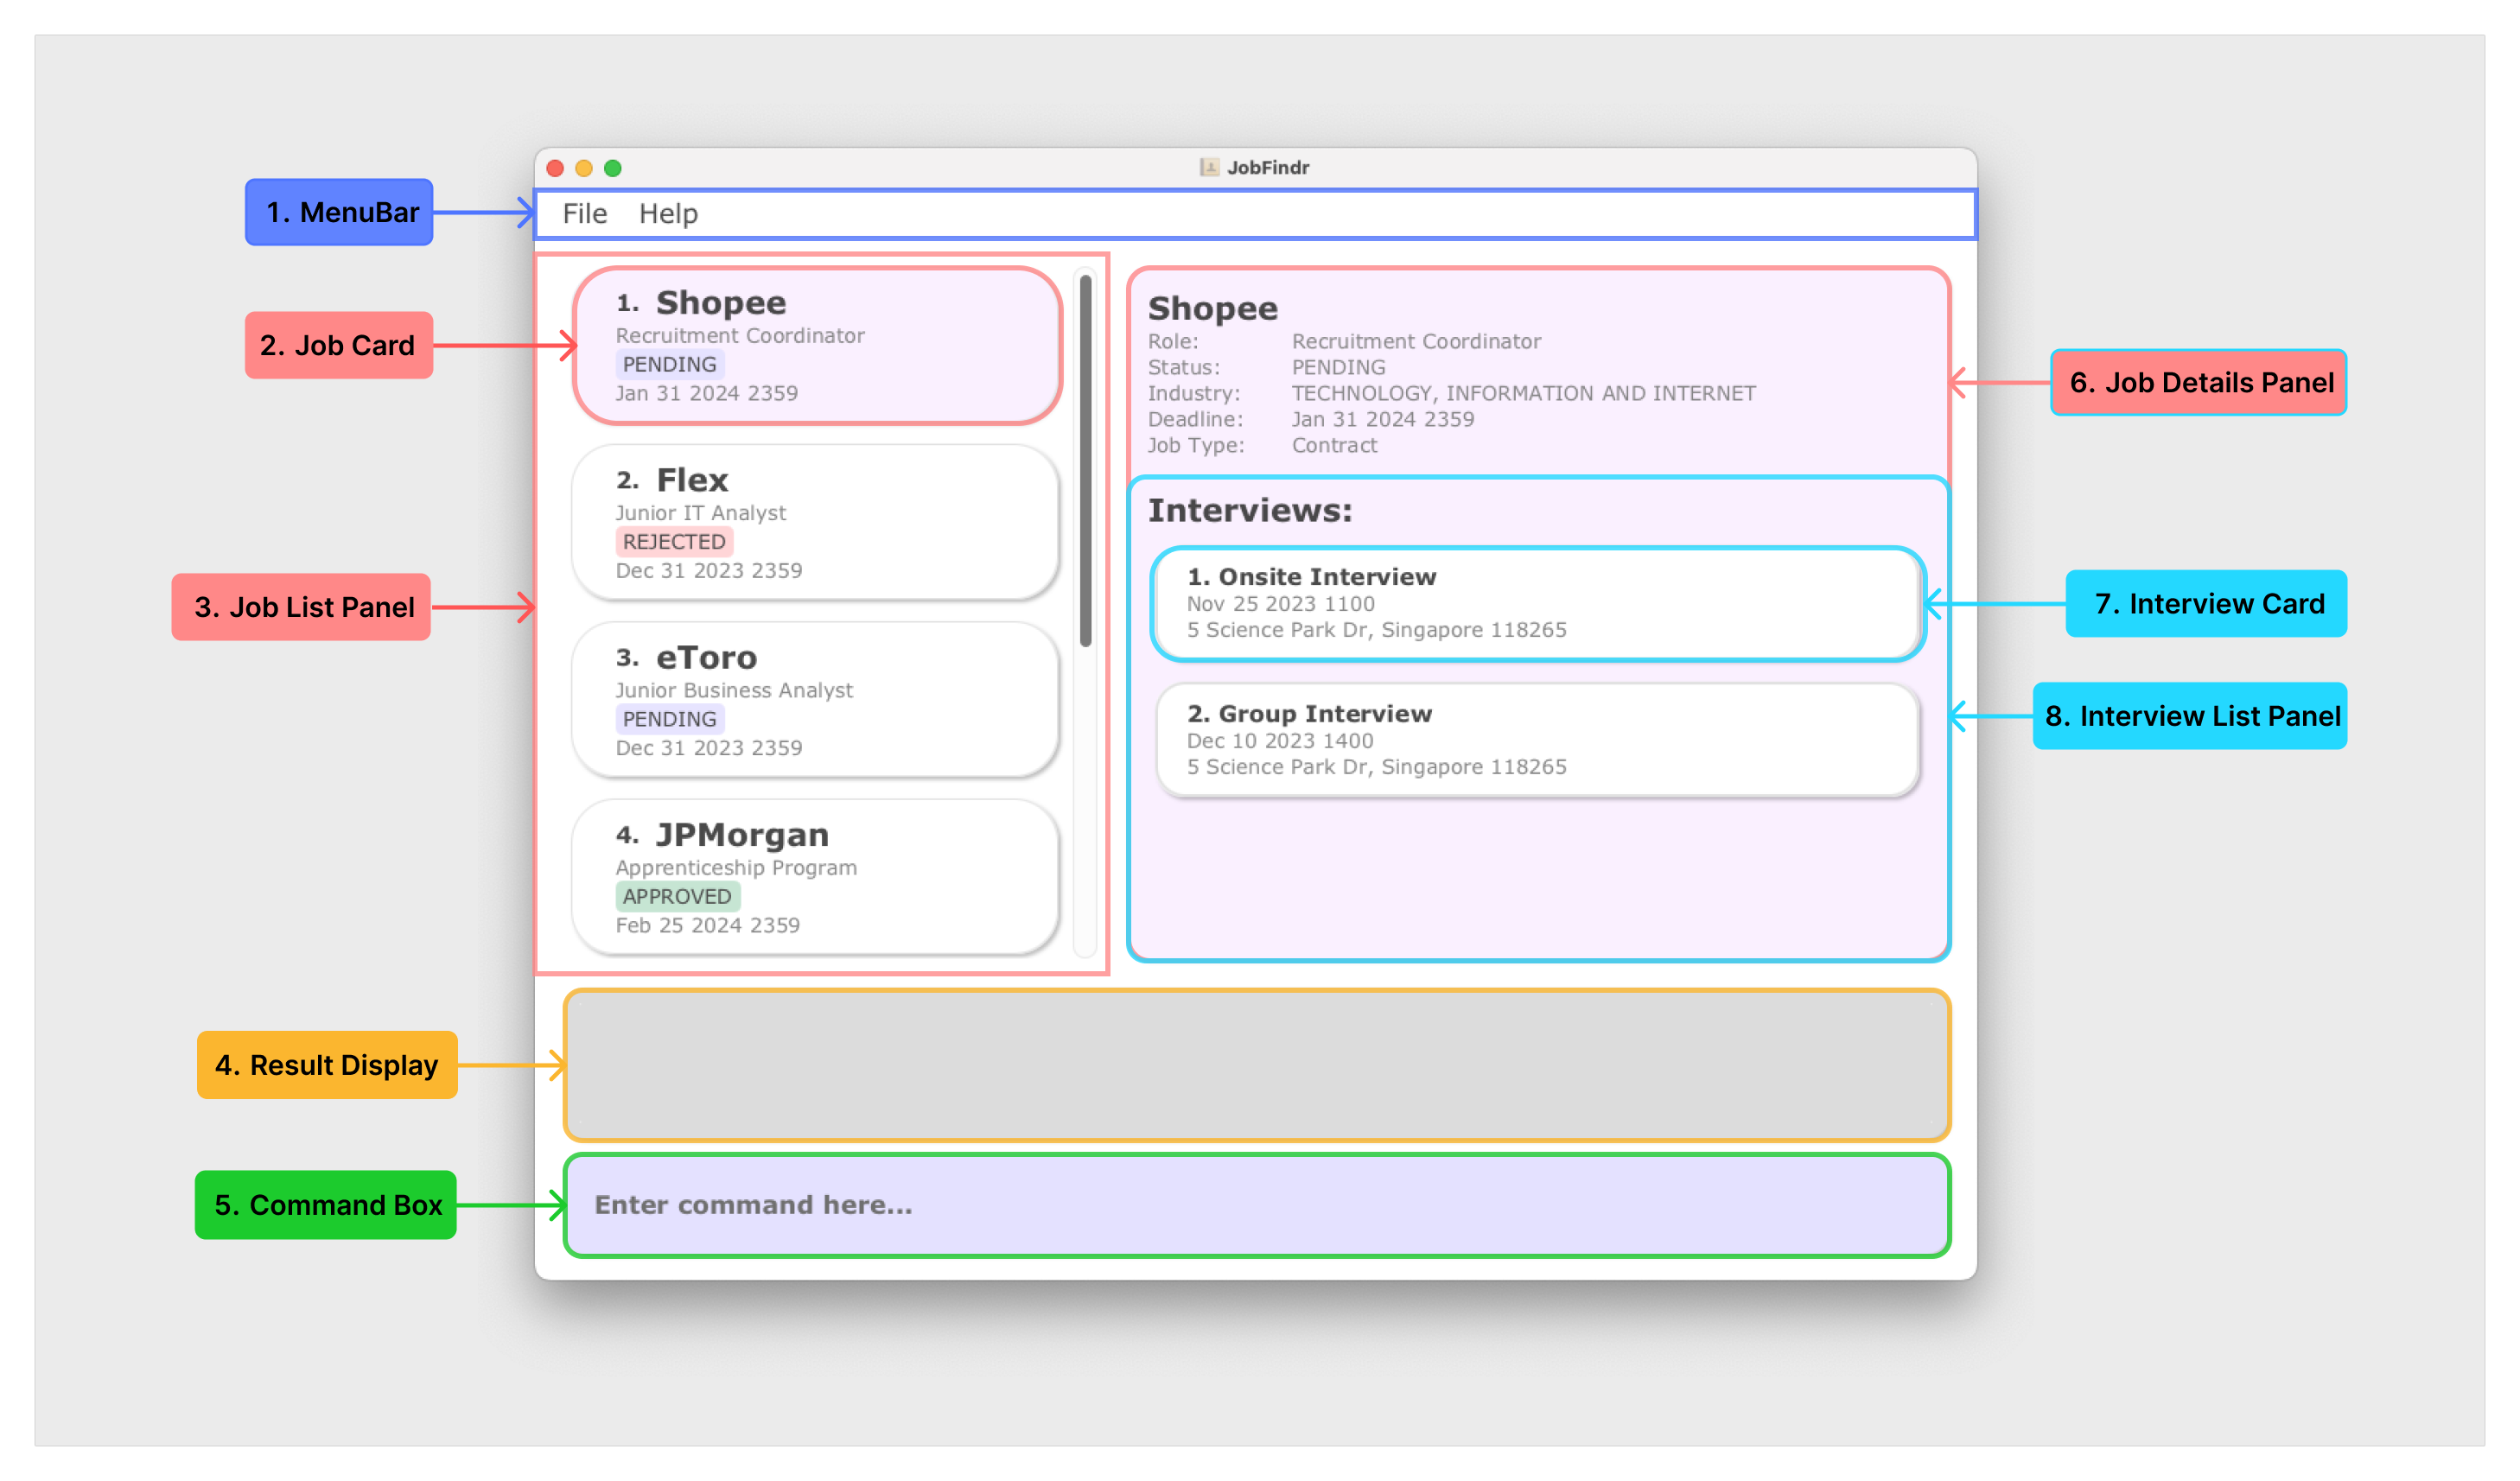
| Index | Component | Description |
|---|---|---|
| 1 | Menu Bar | Contains system based features like exit and help
|
| 2 | Job Card | Displays the specific job application |
| 3 | Job List Panel | Displays the list of applications you have added to JobFindr |
| 4 | Result Display | Displays success or error messages of the most recent command |
| 5 | Command Box | Key in your commands here |
| 6 | Job Details Panel | Displays detail of the application you have selected |
| 7 | Interview Card | Displays the specific interview |
| 8 | Interview List Panel | Displays the list of interviews you have added to that job application |
Structure of a Job Application
| Field | Prefix | Remarks | Default value | Optional? | Sort Order |
|---|---|---|---|---|---|
| Company | c/ |
No restrictions | NA | No | Alphabetical |
| Role | r/ |
Must only contain alphanumeric characters and spaces | NA | No | Alphabetical |
| Status | s/ |
Possible values in “Valid statuses” | TO_ADD_STATUS | Yes | Alphabetical |
| Industry | i/ |
Must start with an alphanumeric character | TO_ADD_INDUSTRY | Yes | Alphabetical |
| Deadline | d/ |
Must be in the format MMM dd yyyy HHmm (e.g. Dec 01 2030 1200) | TO_ADD_DEADLINE | Yes | Chronological |
| Job Type | t/ |
Possible values in “Valid job types” | TO_ADD_JOB_TYPE | Yes | Alphabetical |
-
Applications with the same company AND role are considered duplicate jobs. JobFindr does not allow the creation of duplicate jobs.
-
Deadline refers to the application submission deadline.
-
All default values are valid inputs.
Valid Statuses
The following are valid statuses:
| Status | Remarks |
|---|---|
TO_ADD_STATUS |
The default status if not specified |
PENDING |
An application that you have applied for but have yet to receive a result |
APPROVED |
An application that you have received a job offer for |
REJECTED |
An application that you have been rejected for |
Valid Job Types
The following are valid job types:
| Job Type | Remarks |
|---|---|
TO_ADD_JOB_TYPE |
The default job type if not specified |
FULL_TIME |
A job with standard working hours |
PART_TIME |
A job with more flexible schedule than a full time job |
INTERNSHIP |
A job that provides hands on experience and focuses on gaining skills |
TEMPORARY |
A job that only lasts for the period of an event |
CONTRACT |
A job that involves a specific agreement until the contract end date |
FREELANCE |
A self-employed job that offers services on a project-by-project basis |
VOLUNTEER |
An unpaid job where time and skills are contributed |
Structure of an Interview
| Field | Prefix | Remarks | Optional? |
|---|---|---|---|
| Type | t/ |
Possible values in “Valid Interview Types” | No |
| DateTime | d/ |
Must be in the format MMM dd yyyy HHmm (e.g. Dec 31 2030 1200) and cannot be earlier than the current date and time | No |
| Address | a/ |
Must start with an alphanumeric character | No |
-
Interviews in the same application with the same type AND datetime AND address are considered duplicate interviews. JobFindr does not allow the creation of duplicate interviews.
-
DateTime of interview can be after Deadline of application.
-
Multiple interviews with the same DateTime can be added if they are not duplicate interviews.
Valid Interview Types
The following are valid interview types:
| Interview Type | Remarks |
|---|---|
BEHAVIOURAL |
An interview that questions about the past experiences |
TECHNICAL |
An interview that tests technical knowledge |
CASE |
An interview in which a case study is provided to be analysed |
GROUP |
An interview with a group of people |
VIDEO |
A video submission interview |
ONLINE |
An online interview |
ONSITE |
An onsite interview |
OTHER |
Other interviews that does not fall into any given categories |
Command Format
-
If you are using a PDF version of this document, be careful when copying and pasting commands that span multiple lines as space characters surrounding line-breaks may be omitted when copied over to the application.
- Words in upper case are the parameters to be supplied by the user.
- e.g. in
add c/COMPANY,COMPANYis a parameter which can be used asadd c/Google.
- e.g. in
- Items in square brackets are optional.
- e.g.
c/COMPANY [s/STATUS]can be used asc/Google s/Pendingor asc/Google.
- e.g.
- Parameters can be in any order.
- e.g. if the command specifies
c/COMPANY r/ROLE,r/ROLE c/COMPANYis also acceptable. - When
INDEXis required, it has to be the first parameter.
- e.g. if the command specifies
- Extraneous parameters for commands that do not take in parameters (such as
help,exitandclear) will be ignored.
- e.g. if the command specifies
help 123, it will be interpreted ashelp.
- e.g. if the command specifies
-
A white space must be included directly before each prefix.
- The same prefix cannot be used multiple times in the same command.
- e.g.
add r/Cleaner c/Google c/Microsoftis an invalid input.
- e.g.
-
INDEXandJOB_INDEXrefers to the index number of the chosen application in the displayed application list and must be a positive integer 1, 2, 3, … -
INTERVIEW_INDEXrefers to the index number of the chosen interview of an application and must be a positive integer 1, 2, 3, … - JobFindr should be able to store up to 1000 job applications.
Features
Command Summary
| Action | Format |
|---|---|
| Add | add c/COMPANY r/ROLE [s/STATUS] [d/DEADLINE] [i/INDUSTRY] [t/JOB_TYPE] |
| Edit | edit INDEX [c/COMPANY] [r/ROLE] [s/STATUS] [d/DEADLINE] [i/INDUSTRY] [t/JOB_TYPE] |
| Delete | delete INDEX |
| List | list |
| Find | find [KEYWORDS] [c/COMPANY] [r/ROLE] [s/STATUS] [d/DEADLINE] [i/INDUSTRY] [t/JOB_TYPE] |
| Sort | sort PREFIX |
| Interview add | interview add INDEX t/TYPE d/DATETIME a/ADDRESS |
| Interview delete | interview delete INTERVIEWINDEX from/JOBINDEX |
| Interview edit | interview edit INTERVIEWINDEX from/JOBINDEX |
| Help | help |
| Clear | clear |
| Exit | exit |
General Features
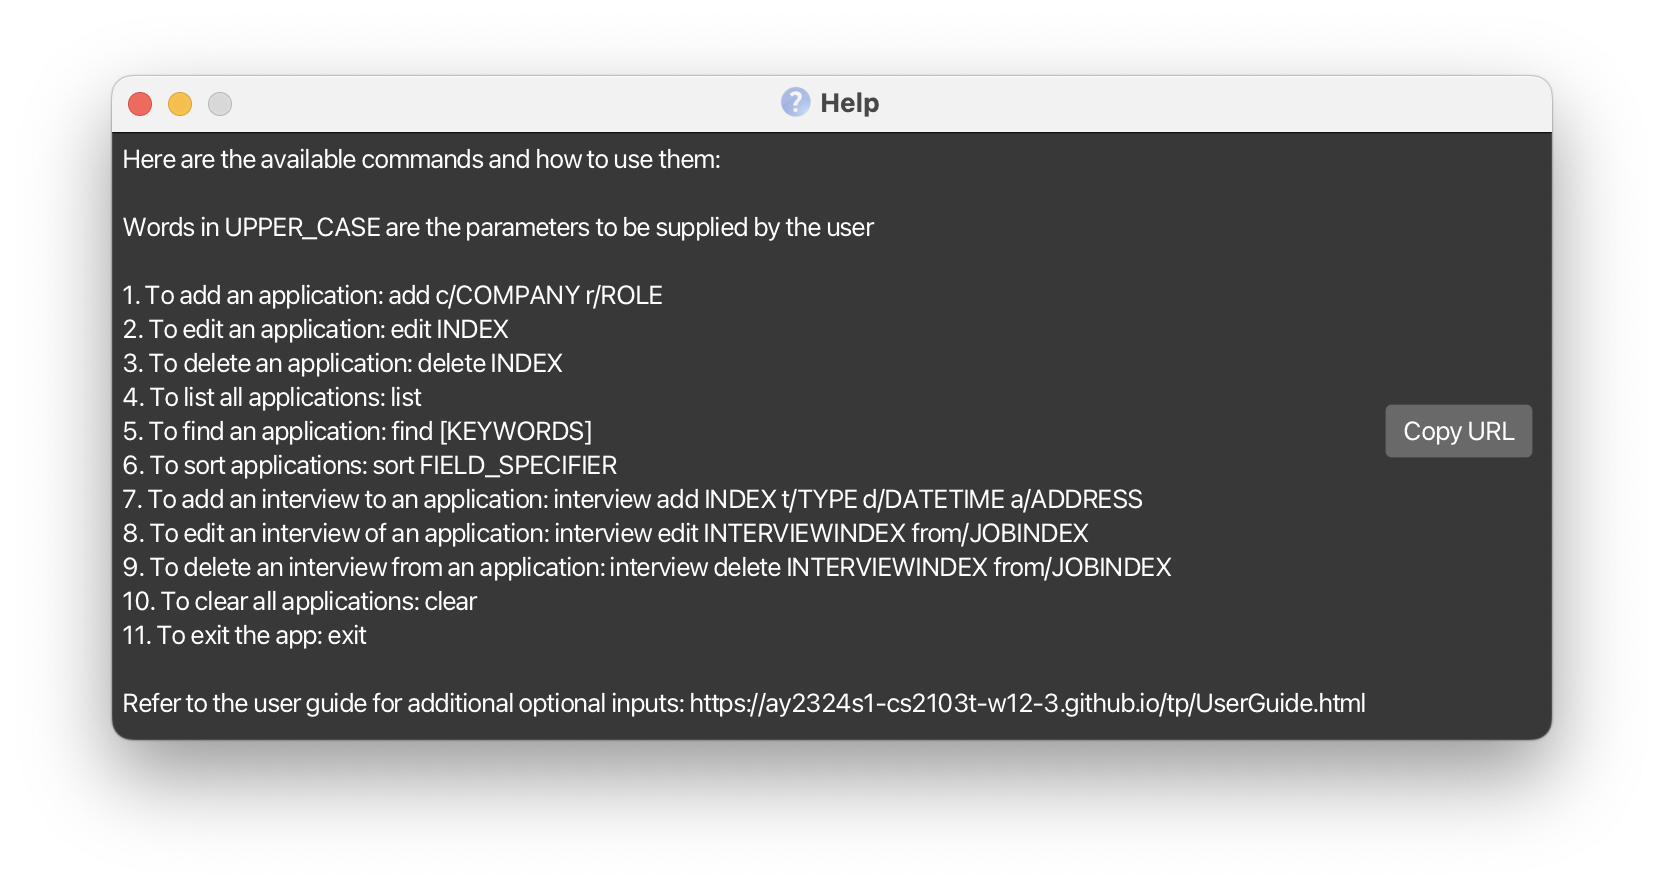
Asking for help: help
Shows a list of commands and how they can be used.
This command opens up a separate window, displaying all the available commands on JobFindr and their formats.
Format: help
Successful Example:
 ↑ Back to Table of Contents
Exiting the programme: exit
Exits the program.
Format: exit
![]() Notes:
Notes:
- Job applications will be saved automatically, no further action is required!
Job Application Features
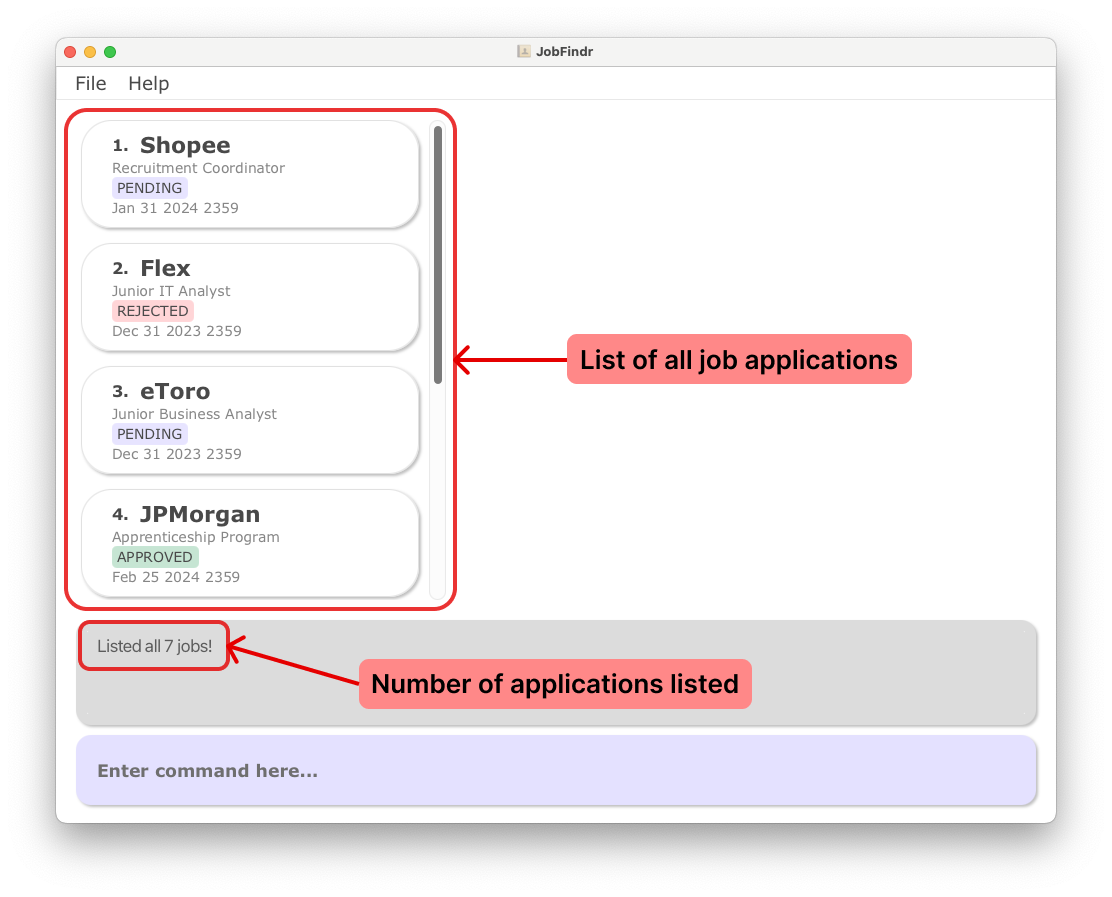
Listing all Applications : list
Shows a list of all job applications in alphabetical order of the company name.
Format: list
Successful Example:
Step 1: Type list in the Command Box and press Enter.

![]() Useful Tips:
Useful Tips:
- You may navigate through the Job List Panel using the Up/Down arrow keys or use the Scroll Bar.
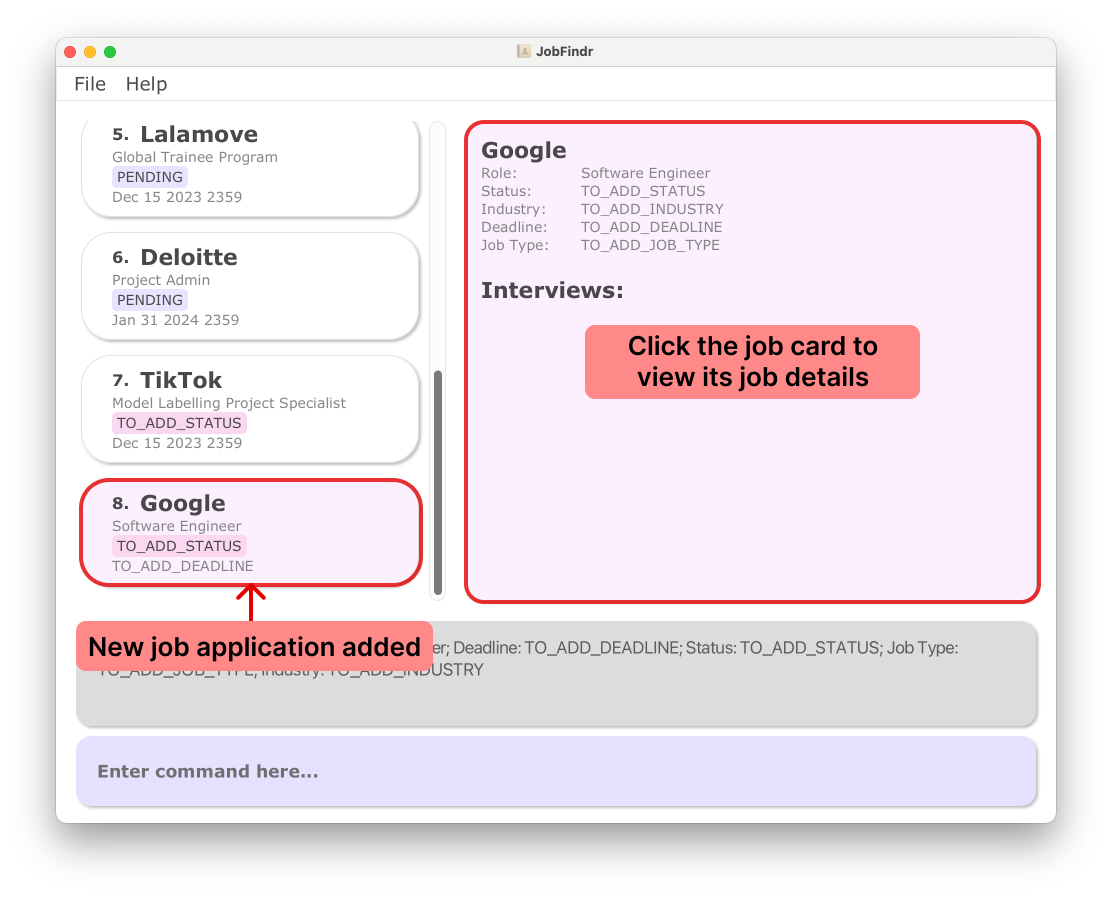
Adding an Application : add
Adds a job application to the list.
Format: add c/COMPANY r/ROLE [s/STATUS] [d/DEADLINE] [i/INDUSTRY] [t/JOB_TYPE]
![]() Useful Tips:
Useful Tips:
- Only Company and Role are compulsory fields to enter an application.
- Order of the fields can be changed.
Successful Example:
Step 1: Enter a basic job application into the Command Box add c/Google r/Software Engineer and press Enter.
- This command adds a job application for the company Google with the role Software Engineer.
- Optional fields like deadline, status, industry, and job type are not provided, so they will use their default values.

Step 2: You will see a new Job Card added to the Job List Panel. Click on it and will see its Job
Details Panel appear on the right side of the window.
Common Errors:
- Missing required fields:
add r/Data Analyst- This command is invalid because it doesn’t provide the
c/COMPANYfield, which is compulsory. - Try adding a company with company field included eg.
add c/Facebook r/Data Analyst
- This command is invalid because it doesn’t provide the
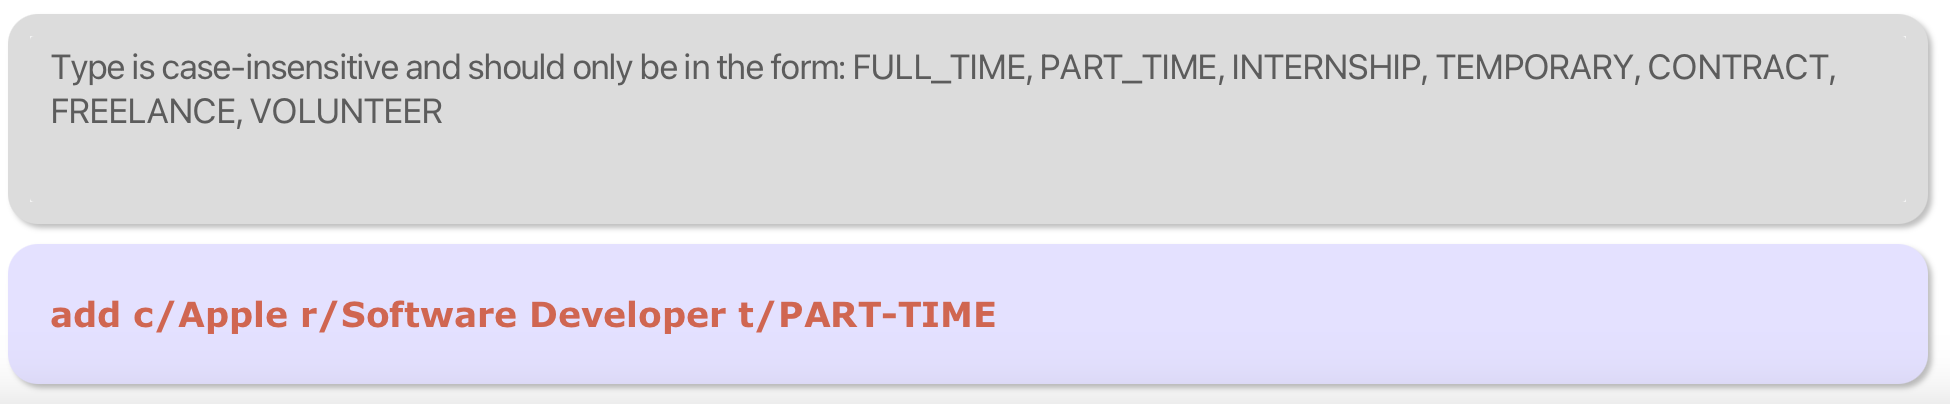
- Invalid Job Type:
add c/Apple r/Software Developer t/Part-Time- This command is invalid because
t/t/PART-TIMEis not a valid job type due to the dash-. It should be an underscore_instead entert/PART_TIME.
- This command is invalid because
Deleting an Application : delete
Deletes the specified application from the list using the specified INDEX.
Format: delete INDEX
![]() Useful Tips:
Useful Tips:
- Try using ths list command to display all job applications before deleting an application.
Successful Example:
Step 1: Enter the list command to list all the available job applications.
Step 2: Locate the index of the job application you want to delete.
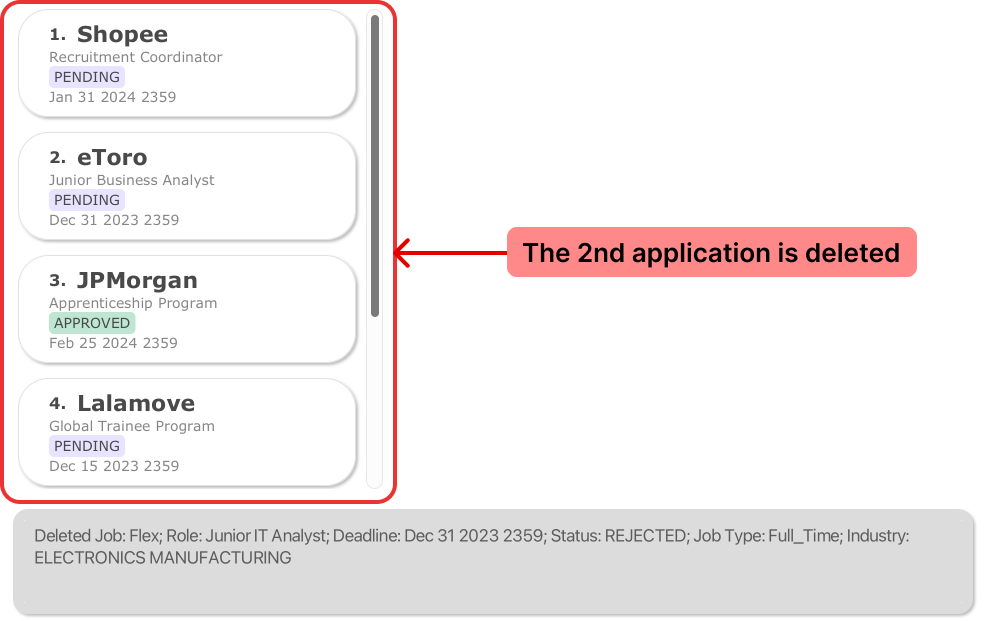
Let’s try typing delete 2 and
press Enter.
- This command deletes the job application at the 2nd index in the list.
- This is provided that this job application indeed exists.
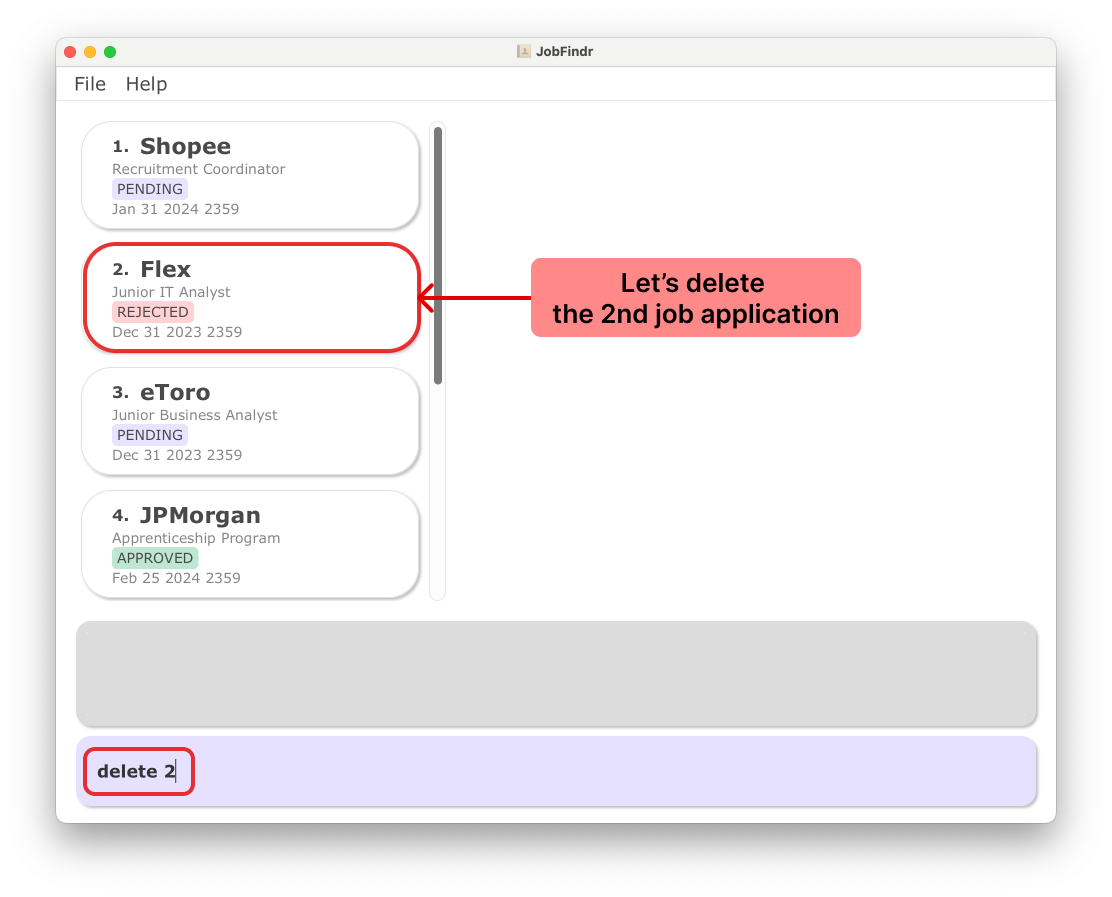
Step 3: Now you will see the 2nd application removed from the list of jobs.
Common Errors:
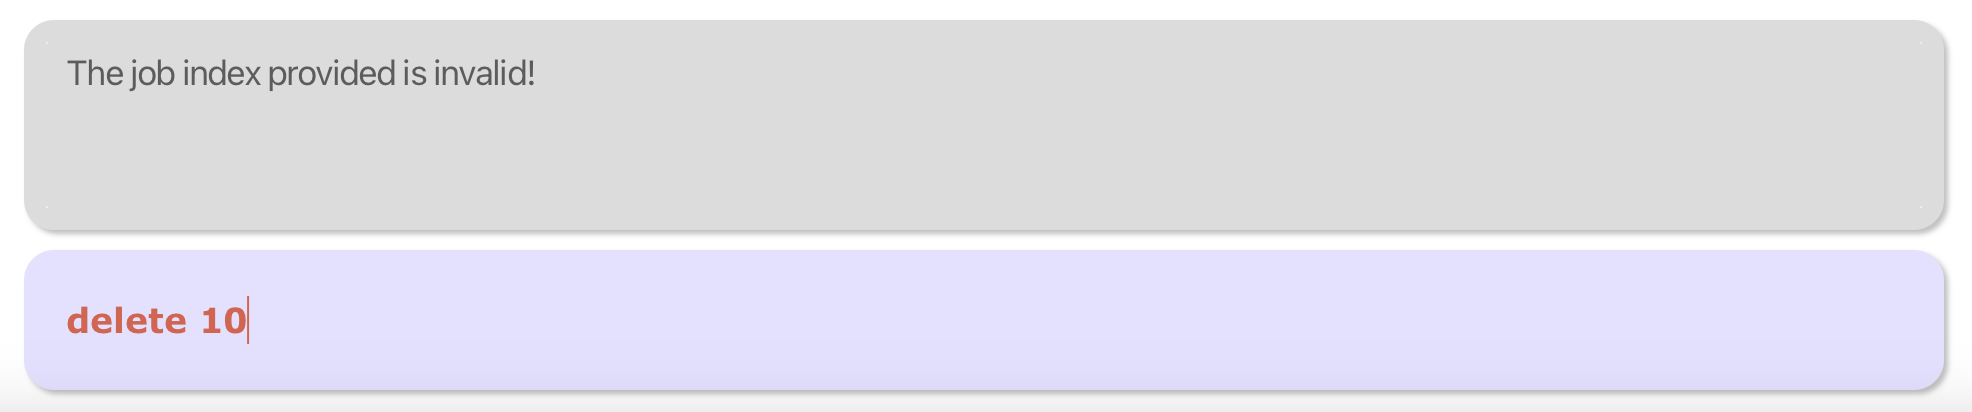
- Invalid job index:
delete 10when there is no job application at index 10.- This command is invalid because 10 is not a valid job index. Use list command to find the job application and its index on its Job Card.
Editing an Application : edit
Edits the application to the company at the specified INDEX
Format: edit INDEX [c/COMPANY] [r/ROLE] [s/STATUS] [d/DEADLINE] [i/INDUSTRY] [t/JOB_TYPE]
![]() Warning:
Warning:
- A valid index must be provided.
- At least one of the fields must be provided.
Successful Examples:
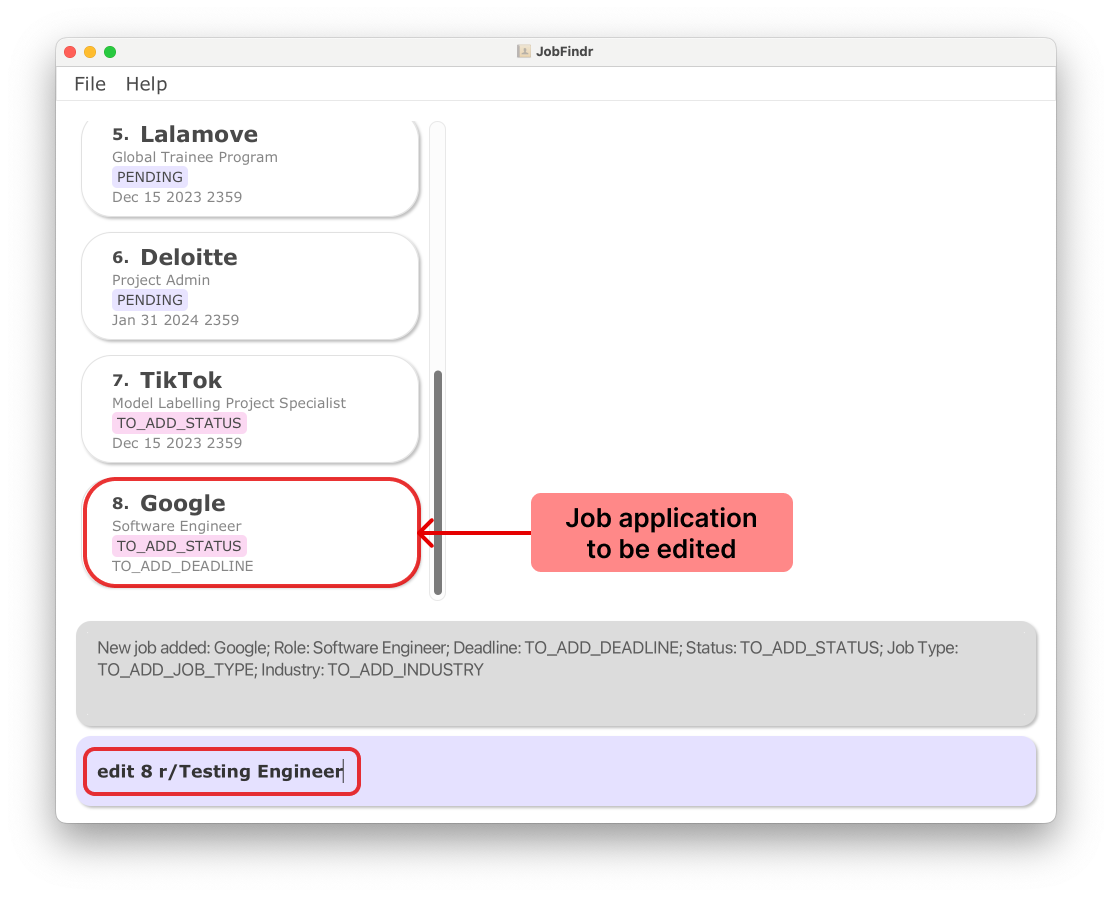
Editing One Field
Step 1: Now you realised you have seen the job listing wrongly and wish to change the role of the job complication
to Google. Type edit 8 r/Test Engineer and press Enter.
- This command edits the role of the
Googleapplication toTest Engineer
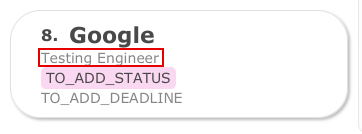
Step 2: You will see the newly updated Job Card for the role field at Google.
Editing Multiple Fields
Step 1: Trying editing multiple fields for a job application with one command.
Type edit 2 c/Amazon r/Product Manager d/Dec 15 2023 1000 s/APPROVED and press Enter.
- This command edits the company, role, deadline, and status of the second job application.
- Make sure there is a job application at index 2.
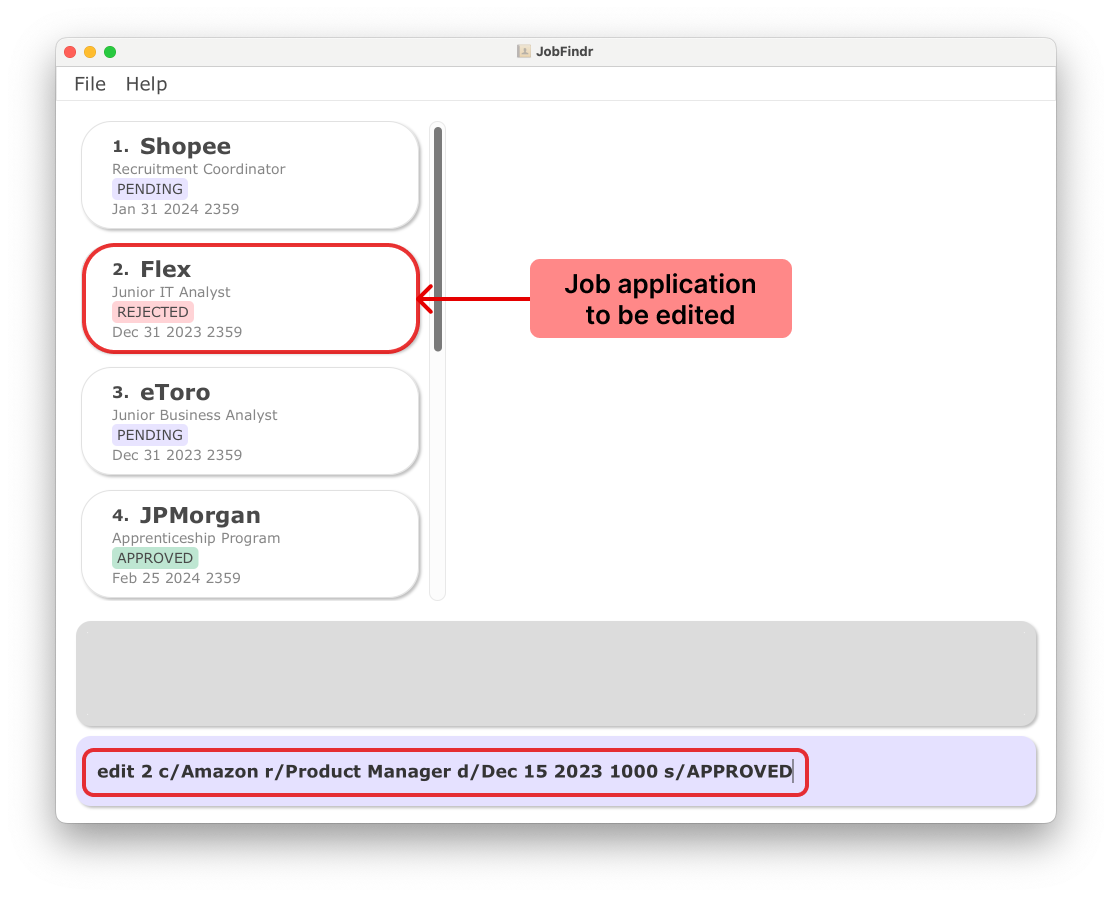
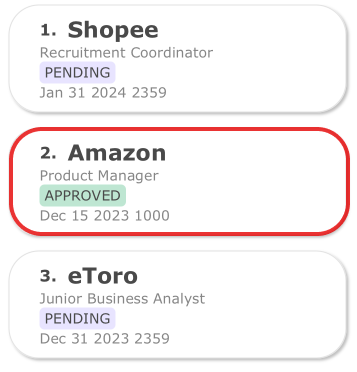
Step 2: You will see the 2nd Job Card in the list being updated.
Common Errors:
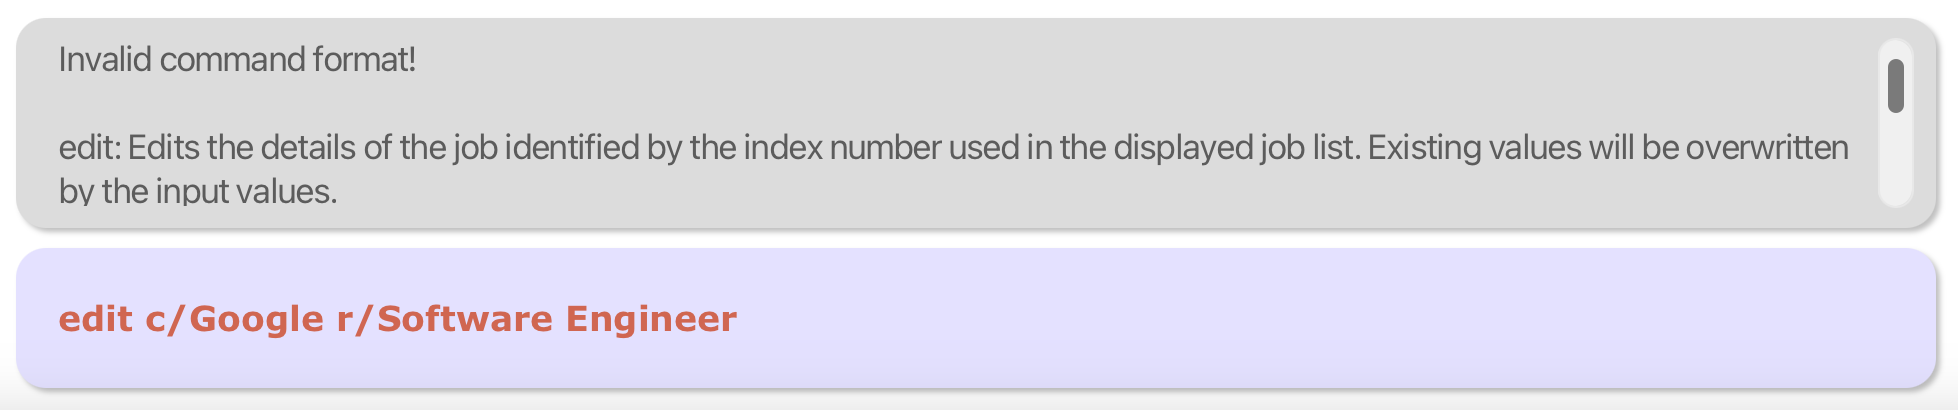
- Missing index:
edit c/Google r/Software Engineer- This command is invalid because it doesn’t specify the index of the job application to edit.
- Invalid field:
edit 3 q/Designer- This command is invalid because
q/Designeris not a valid field. It should ber/Designer.
- This command is invalid because

- Invalid Job Type:
edit 4 t/PART-TIME- This command is invalid because
t/t/PART-TIMEis not a valid job type due to the dash-. It should be an underscore_instead entert/PART_TIME.
- This command is invalid because

Clearing all Applications: clear
Clears all job applications from JobFindr.
Format: clear
![]() Warning:
Warning:
- This command is irreversible! Be aware of using this command.
Finding an Application : find
Finds all applications whose fields match the keywords provided.
Format: find [KEYWORDS] [c/COMPANY] [r/ROLE] [s/STATUS] [d/DEADLINE] [i/INDUSTRY] [t/JOB_TYPE]
![]() Warning:
Warning:
- At least one of the parameters above must be provided. Multiple parameters can be included in one command.
- An application will be listed only if it contains ALL the keywords provided.
![]() Notes about Command Format:
Notes about Command Format:
![]() Notes about KEYWORDS Parameter:
Notes about KEYWORDS Parameter:
- Keywords are case-insensitive.
- Multiple words can be provided for one
KEYWORDSparameter.- e.g.
find r/Software Engineeris a valid command.
- e.g.
- Applications with partially matching keywords will not be listed.
- e.g. searching for the keyword
Goowill not list applications containingGoogle.
- e.g. searching for the keyword
- Characters not separated by white space are considered ONE word.
- e.g. searching for the keyword
ADDwill not list applications containingTO_ADD_DEADLINE.
- e.g. searching for the keyword
Successful Examples:
Find by Specific Field:
Step 1: Let’s try finding job application with the company field.
Type find c/Tiktok and press Enter.
- This command searches for all job applications with
Tiktokin the company name.

Step 2: All matching job applications will be displayed in the Job List Panel.
- Click the Job Card to display its details in the Job Details Panel.

Find by Multiple Conditions:
Step 1: Let’s try finding job application with by applying multiple conditions in the find command.
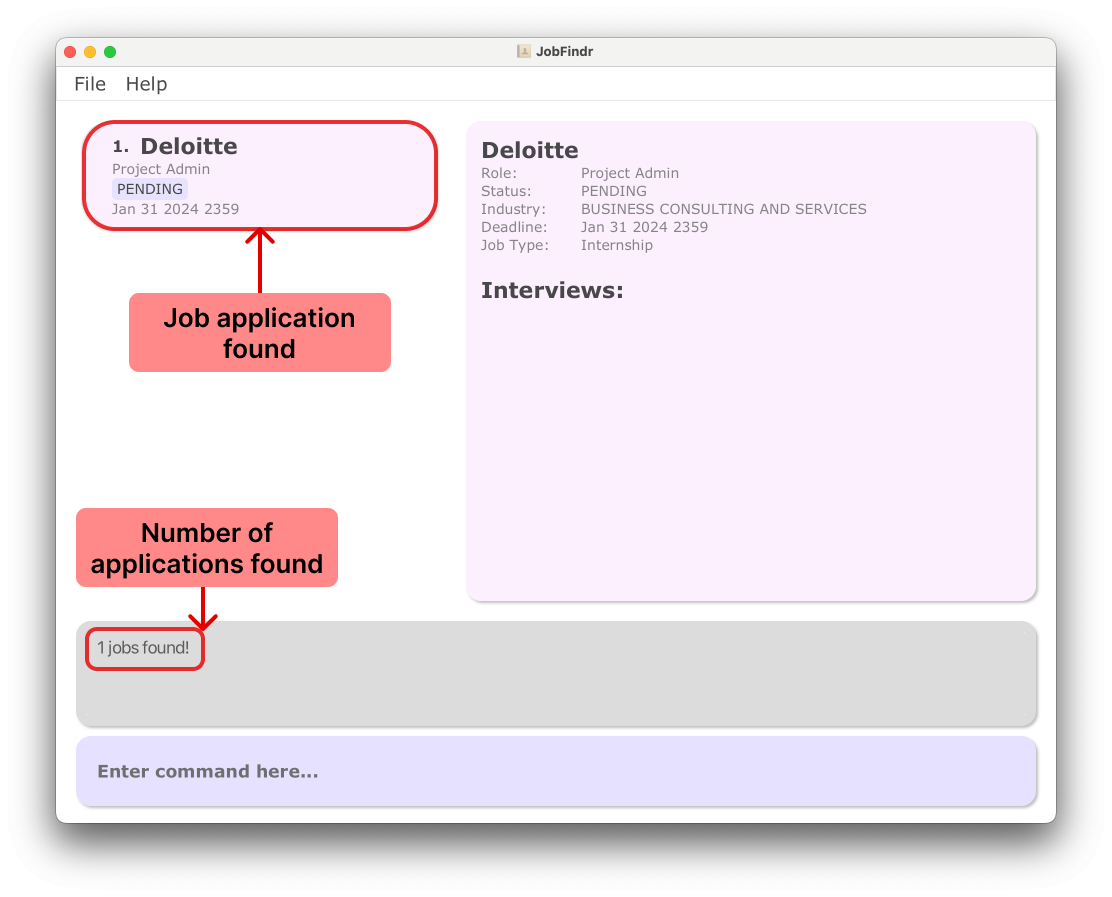
Type find Project c/Deloitte and press Enter.
- This command searches for all job applications with
Projectin any field and the wordsDeloitteits company field.

Step 2: All matching job applications will be displayed in the Job List Panel.
- Click the Job Card to display its details in the Job Details Panel.
Common Errors:
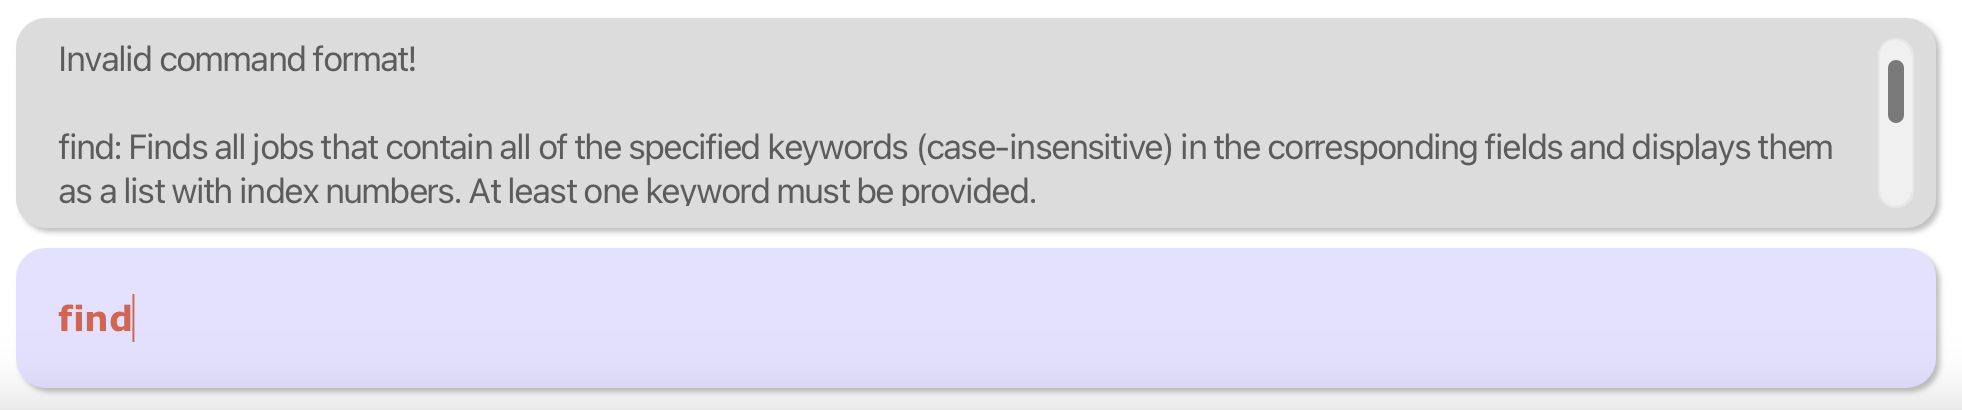
- Missing keywords:
find- This command is invalid because it doesn’t specify any keywords to search for. Please provide at least one
keyword after
find.
- This command is invalid because it doesn’t specify any keywords to search for. Please provide at least one
keyword after
Sorting all applications : sort
Sorts the list based on the prefix provided.
Format: sort PREFIX
![]() Warning:
Warning:
- A single valid
PREFIXmust be provided. Refer to “Structure of a job application” for the list of valid prefixes.
![]() Notes:
Notes:
- The sort order cannot be reversed.
- e.g. when sorting by
company, companies cannot be listed from Z-A.
- e.g. when sorting by
- For optional fields, applications with empty fields will be listed first.
Successful Examples:
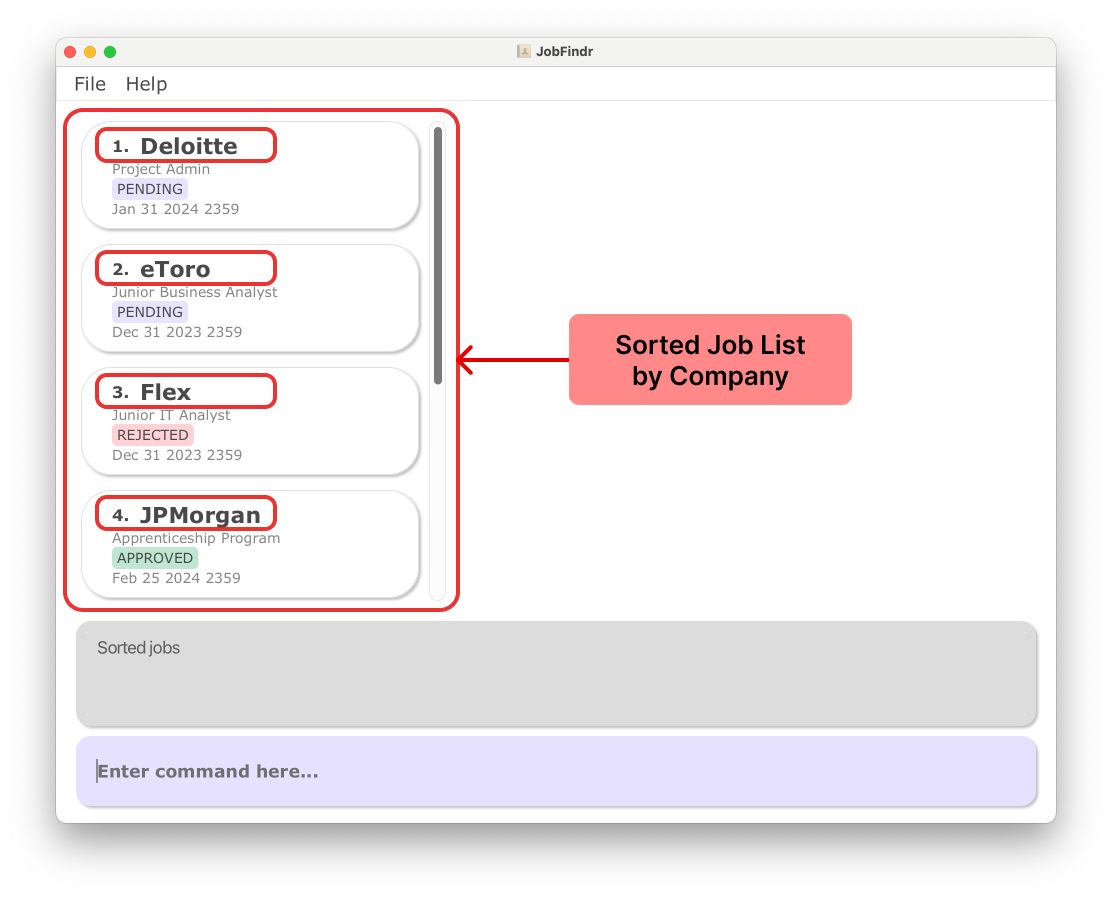
Sort by Company:
Step 1: Let’s start by sorting the job application by company name. Type sort c/ and press Enter.
- This command sorts all job applications in ascending alphabetical order of company name.

Step 2: A sorted list of job applications by company will be displayed in the Job List Panel.
Sort by Deadline:
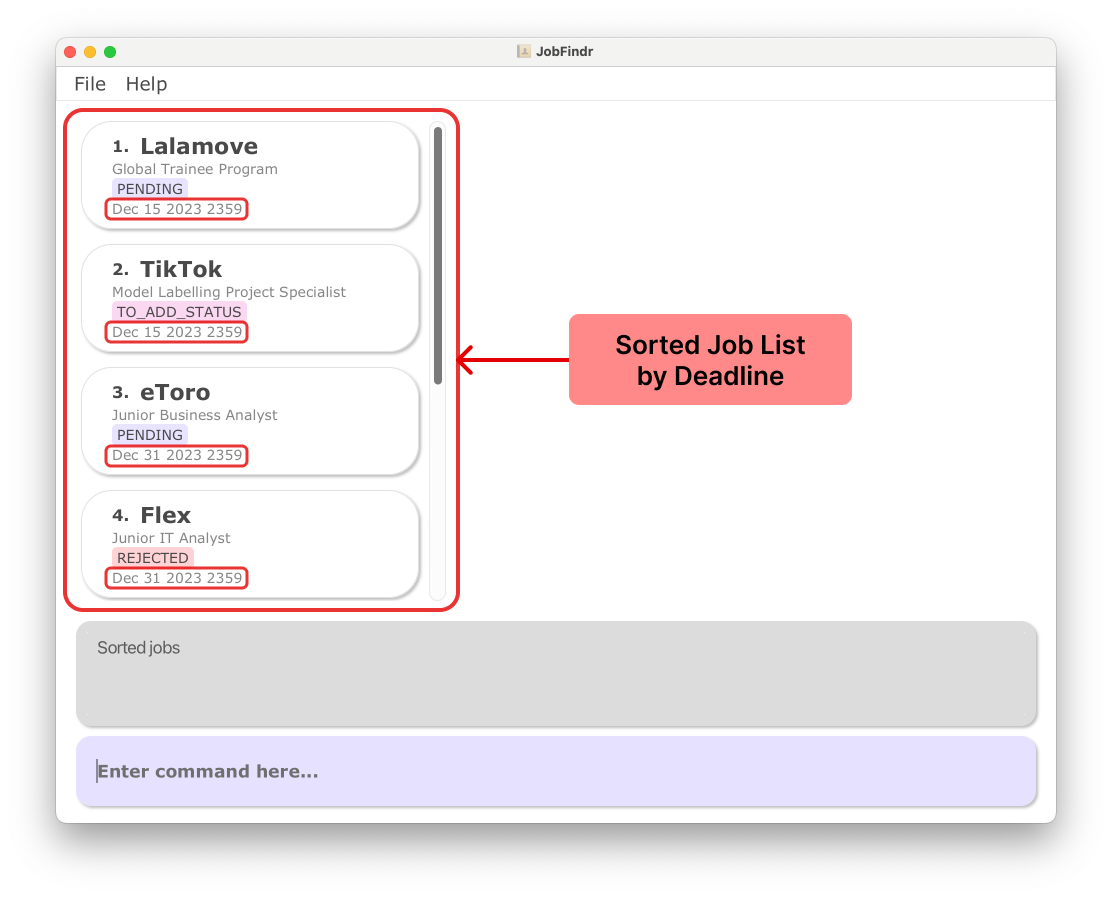
Step 1: Let’s try another prefix and sort the job application by deadline. Type sort d/ and press Enter.
- This command sorts all job applications in chronological order of deadline, starting from applications with the
earliest deadline.

Step 2: A sorted list of job applications by deadline will be displayed in the Job List Panel.
Common Errors:
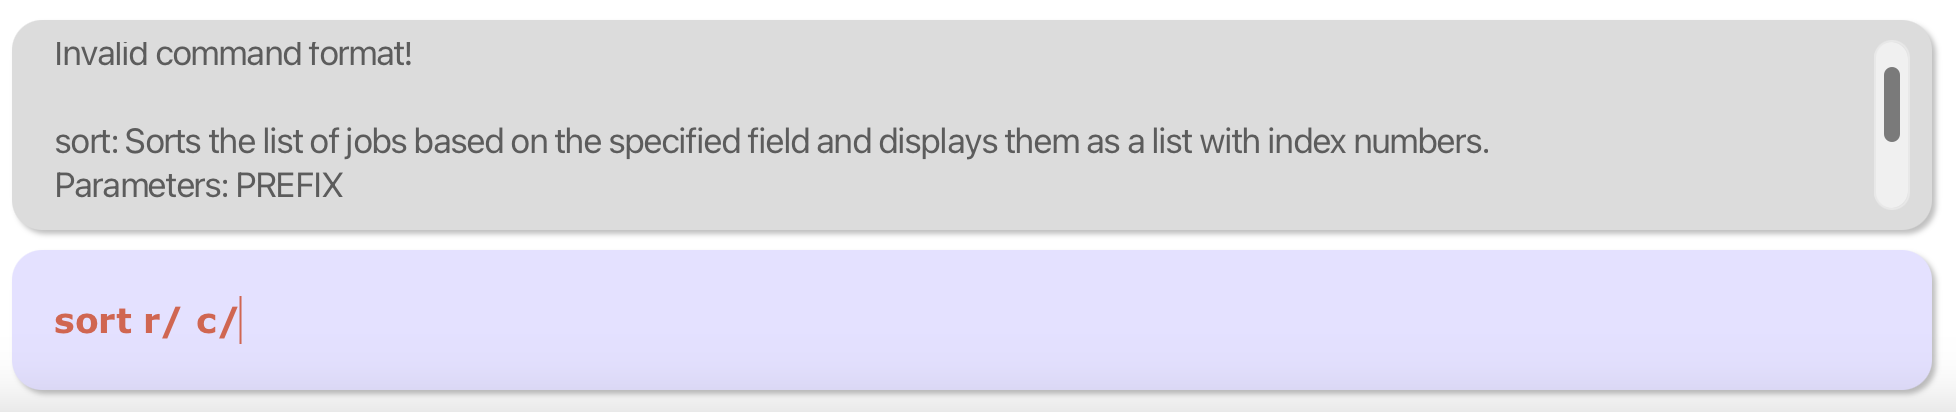
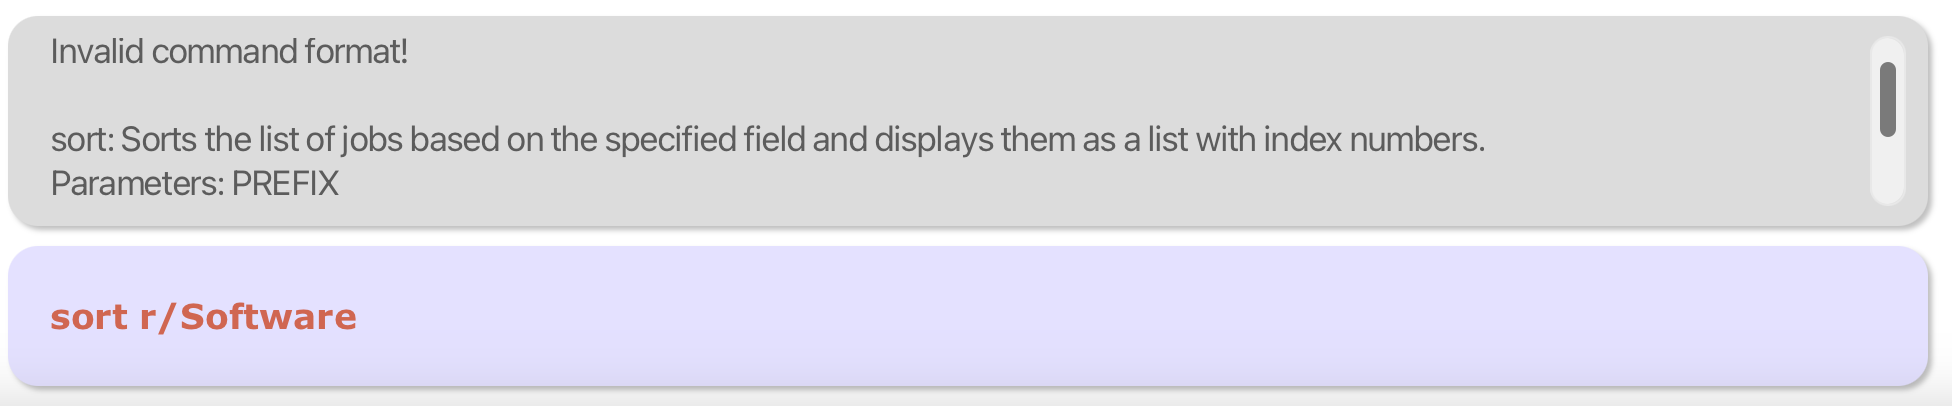
- Multiple prefixes:
sort r/ c/- This command is invalid because only one prefix is accepted.
- Input following prefix:
sort r/Software- This command is invalid because there should be nothing following the
prefixprovided. Enter thesortcommand without any keyword after theprefix.
- This command is invalid because there should be nothing following the
Interview Features
Adding an Interview: interview add
Adds an interview to a specified job application.
Format: interview add INDEX t/TYPE d/DATETIME a/ADDRESS
![]() Warning:
Warning:
- All fields (Index, Type, DateTime, Address) are compulsory.
Successful Example:
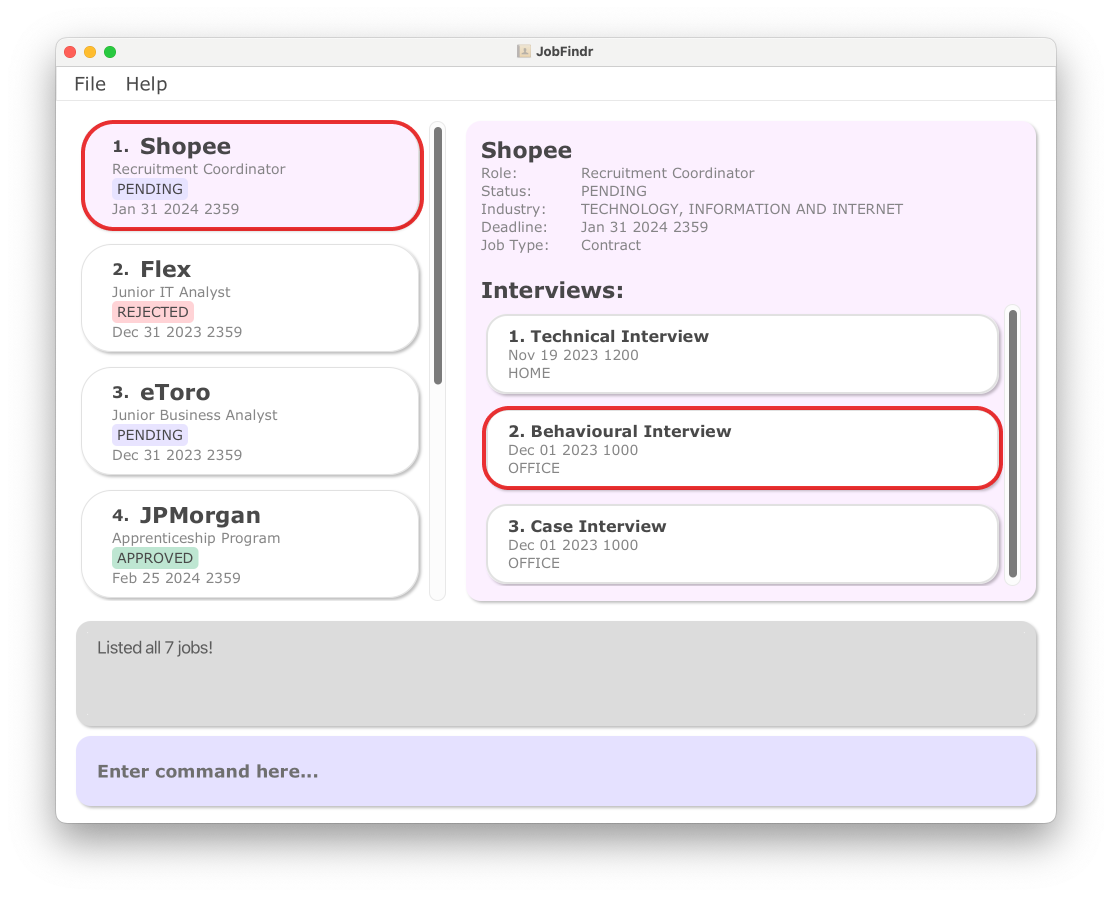
Step 1: Let us add an interview to the first job application in our list of job application. Start by listing all
the available jobs on JobFindr. Type list and press Enter.
Step 2: Identify the first job application in the list by looking at the Job List Panel. Click on the first job’s Job Card to display its Job Details Panel.
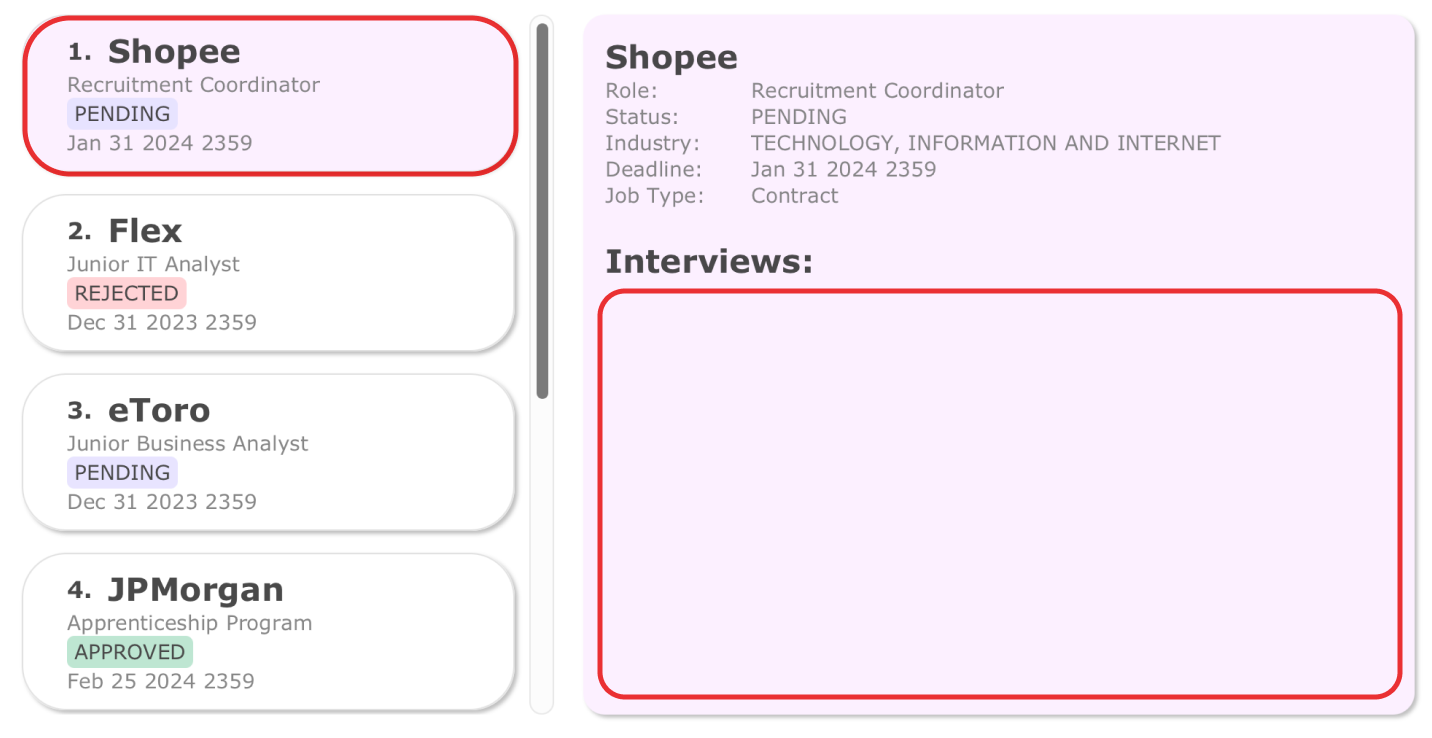
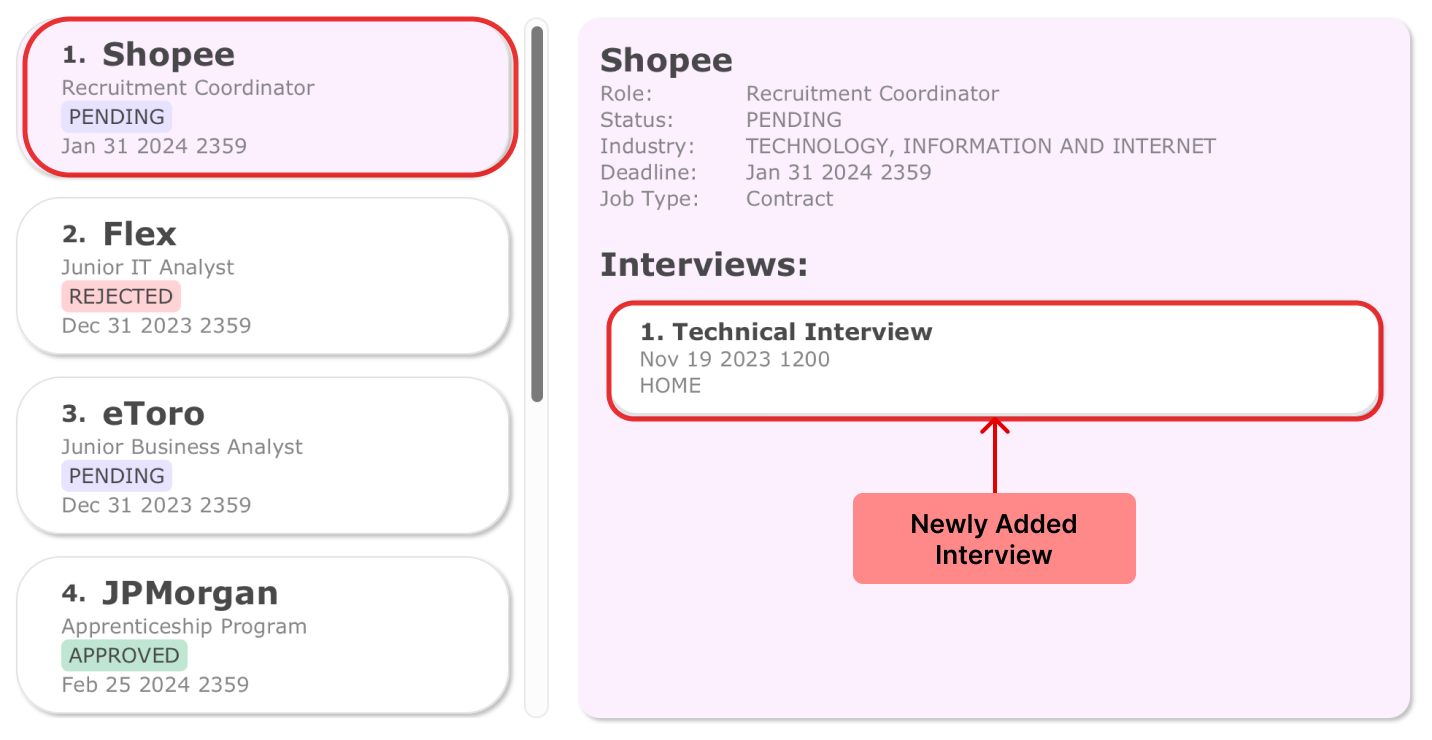
Step 3: Type interview add 1 t/Technical d/Nov 19 2023 1200 a/Home and press Enter.
- This command adds a technical interview on Nov 19 2023 1200 that will be done at Home to the first application in the list.

Step 4: You will see a new interview being added to the Interview List of the first job application, in this case it is for Shopee.
Common Errors:
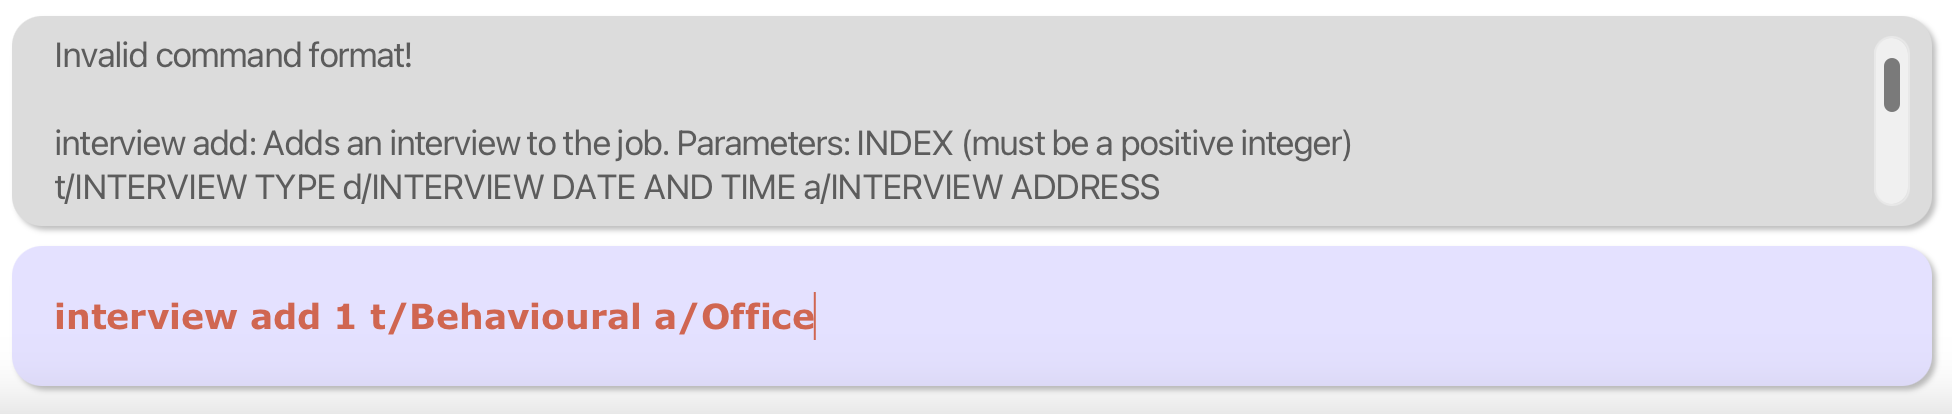
- Missing Compulsory Fields:
interview add 1 t/Behavioural a/Office.- This command is invalid as there is missing
d/DATETIME. All the fields are compulsory and cannot be left out. Include all fields for the command to be valid. - eg.
interview add 1 t/Behavioural a/Office d/Dec 01 2023 1000
- This command is invalid as there is missing
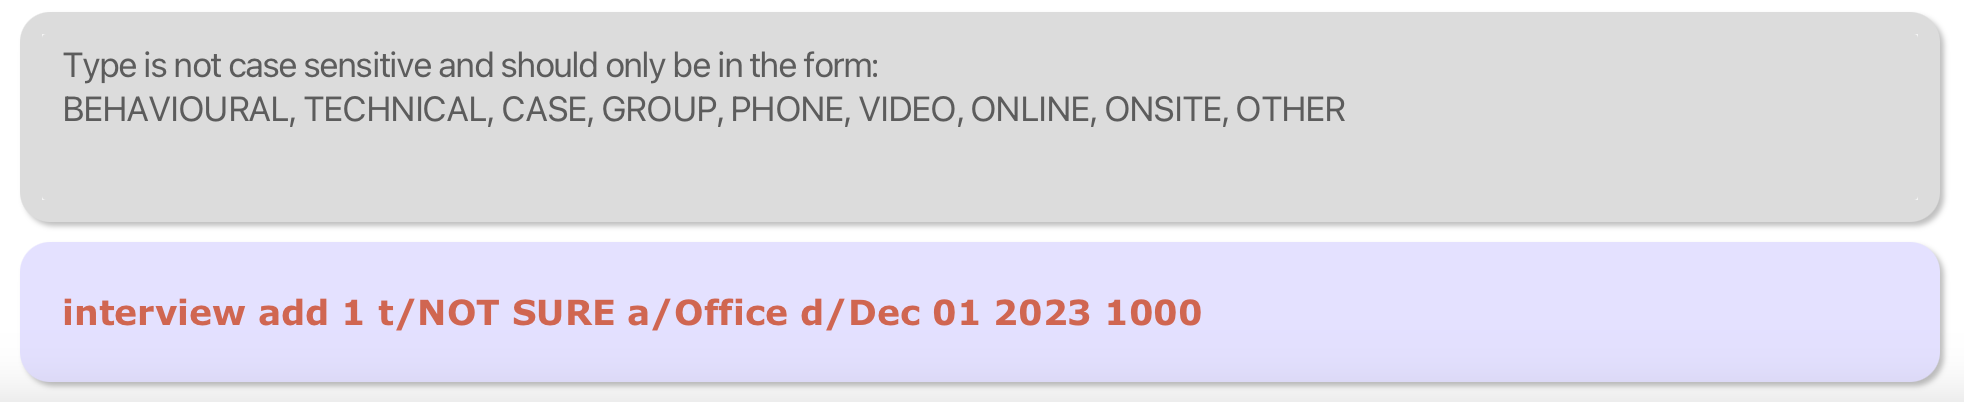
- Invalid/Missing input for any field:
interview add 1 t/NOT SURE a/Office d/Dec 01 2023 1000- If any fields have invalid/missing input, Result Display will show the possible valid inputs for that field.
- So instead of putting
NOT SUREfor the interviewtype, we can putOTHERinstead.
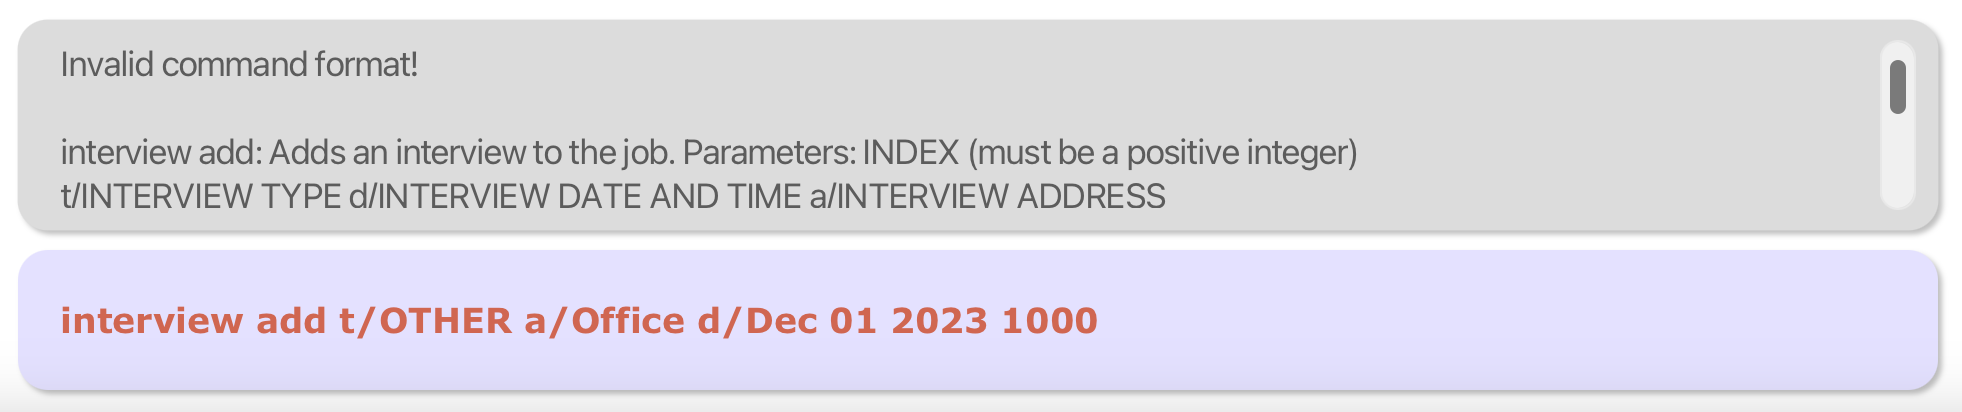
- Invalid/Missing index:
interview add t/OTHER a/Office d/Dec 01 2023 1000- Without a valid index, JobFindr will not be able to identify the application you wish to add the interview to.
- Provide a valid index for the job application. eg.
interview add 1 t/OTHER a/Office d/Dec 01 2023 1000
Deleting an Interview: interview delete
Deletes the interview at the INTERVIEW_INDEX from the job application at JOB_INDEX
Format: interview delete INTERVIEW_INDEX from/JOB_INDEX
![]() Warning:
Warning:
- Both indexes for job application and interview must be provided and valid.
Successful Example:
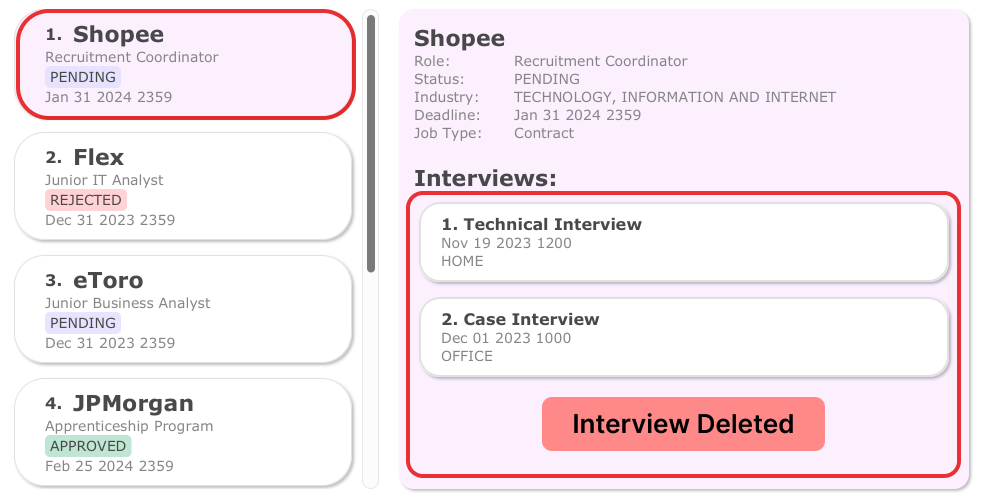
Step 1: Identify the interview and its job application that you want to delete. Try using list or find command
to find the specific job application. Click on the job’s Job Card to display its interview.
- Let’s try to delete
Behavioral InterviewfromShopee.
Step 2: So we have identified that the interview we want to delete is the 2nd interview in the 1st job
application.
Let’s type interview delete 2 from/ 1 and press Enter.

Step 3: We will now see that the Behavioral Interview from Shopee has been removed.
Common Errors:
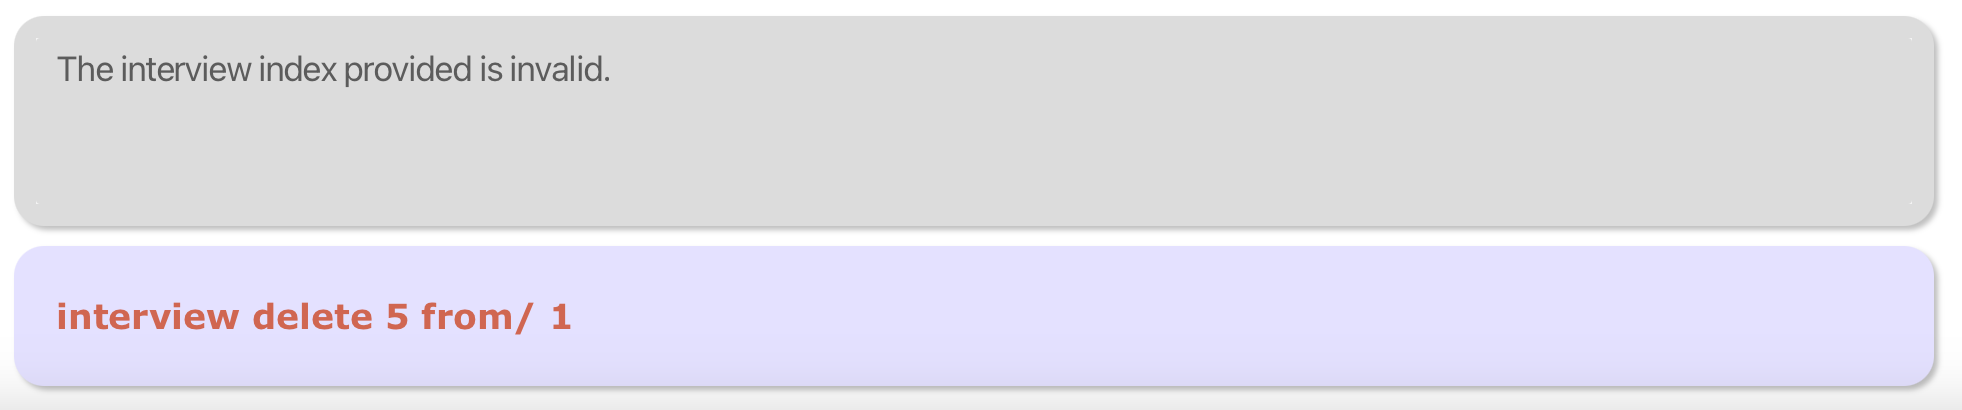
- Invalid/Missing index:
interview delete 5 from/1- This is invalid if there is no interview at index 5 for the 1st job application.
- Click on the Job Card of the 1st application to check the correct index for interview.
Editing an Interview: interview edit
Edits the interview at the INTERVIEW_INDEX from the job application at JOB_INDEX
Format: interview edit INTERVIEW_INDEX from/JOB_INDEX [t/TYPE] [d/DATETIME] [a/ADDRESS]
![]() Notes:
Notes:
- At least one of the optional fields must be provided.
Successful Example:
Step 1: Identify the interview and its job application that you want to edit. Try using list or find command
to find the specific job application. Click on the job’s Job Card to display its interview.
- Let’s edit the
Case InterviewfromShopee.
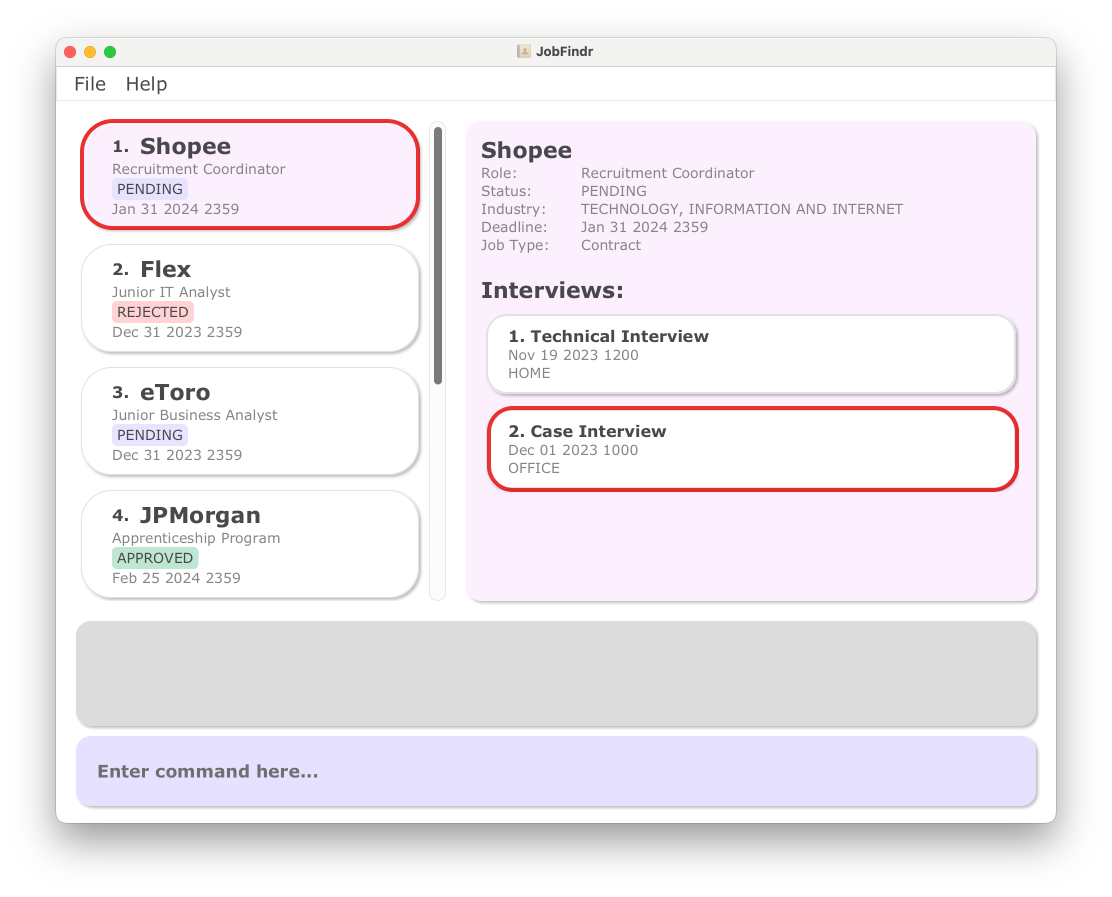
Step 2: Looking at the Interview List Panel, we can see that the interview we want to delete is the
2nd interview in the 1st job application.
Let’s type interview edit 2 from/ 1 d/Jan 20 2024 1200 and press Enter.
- This command will edit the date of the interview to
Jan 20 2024 1200

Step 3: Look at the Interview Card for the Case Interview from Shopee, the date will be edited.

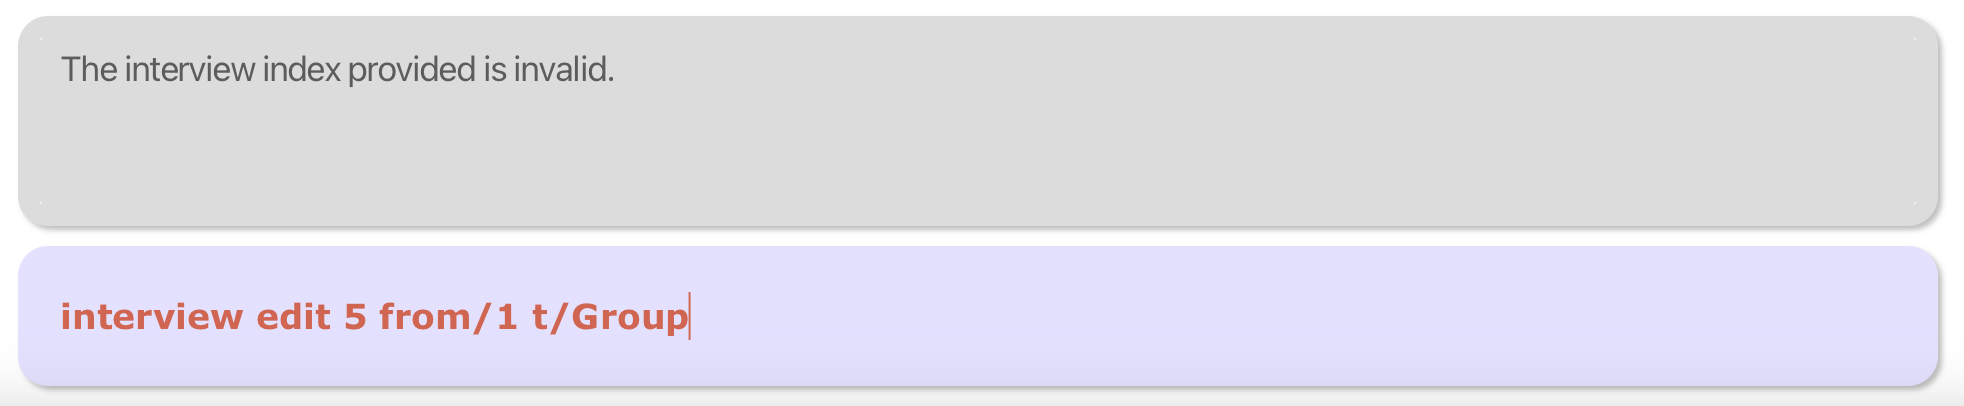
Common Errors:
- Invalid/Missing index:
interview edit 5 from/1 t/Technical- This is invalid if there is no interview at index 5 for the 1st job application.
- Click on the Job Card of the 1st application to check the correct index for interview.
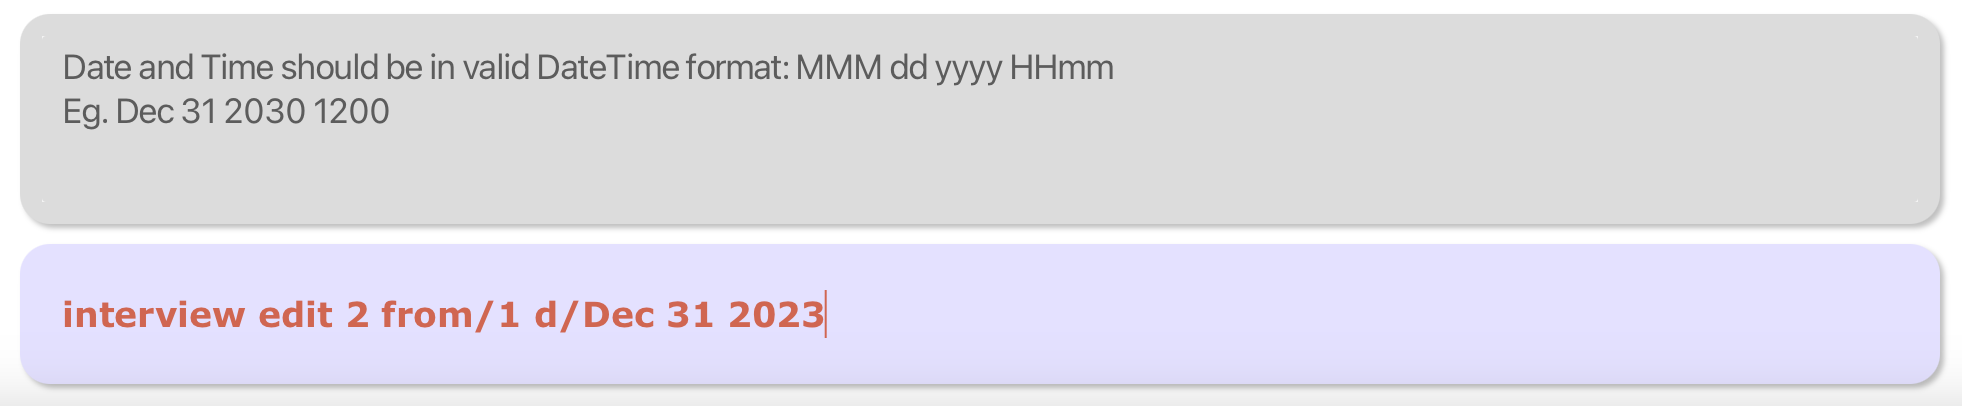
- Invalid/Missing input for any field:
interview edit 2 from/1 d/Dec 31 2023- If any fields have invalid/missing input, Result Display will show the possible valid inputs for that field.
- As
Dec 31 2023is not a validDATETIMEformat, please specify the time as well. Eg.Dec 31 2023 2359
FAQ
1. How do I make sure I have installed the correct Java version?
- Open up terminal on your computer.
- Type
java -versionin your terminal and press Enter. You will see the following if you have installed Java 11 correctly:

- If you do not have Java 11 installed, please refer to this guide to download it to your computer.
2. How do I open up terminal on my computer?
On Mac:
- Open up Spotlight Search by clicking the button in your menu bar. Or simply use the keyboard
shortcut
Command + Space. - Type “Terminal”
- You should see the Terminal application at the top of your results. Double-click it or press Enter to open up Terminal.
On Windows:
- Open your computer’s Start menu by clicking the Windows Start
icon
 in the bottom-left corner of your desktop or press the Win
key
in the bottom-left corner of your desktop or press the Win
key  on your keyboard.
 - Type “Command Prompt” or “Powershell”
- You should see the correct application at the top of your results. Double-click it or press Enter to open up Command Prompt or Powershell.
3. How do I transfer my data to another Computer?
- Install the app in the other computer.
- Overwrite the empty data file it creates with the file that contains the data of your previous ApplicationBook home folder.
4. How do I load data from another Computer?
- Delete the applicationbook.json file (stored at [JAR file location]/data/applicationbook.json) from the computer that you wish to use JobFindr on.
- Copy over the applicationbook.json file from the computer which you no longer wish to use JobFindr on.
- Refer to Quick Start to start up JobFindr and check whether your applications are properly loaded into the new computer.
5. Can I use the application offline?
- Yes, all features of the application can be used offline except for access to external URLs.
- Refer to Quick Start to start up JobFindr.
6. Can I have multiple Job types and Interview types for a single application?
- No, only a single job type can be added for each application and only a single interview type can be added for each interview.
- Choose the type that best suits the job or interview.
Glossary
Job Application
- A record of a job application that contains relevant information.
Fields
- The attributes of a job application: company, role, status, deadline, job type, industry, interview details
- The attributes of an interview: interview type, interview datetime, interview address
Prefix
- An affix that placed before the field to indicate the type of field
- Examples: c/ r/ s/ from/
Alphabetical order
- The arrangement in the same sequence as the letters of the alphabet (A-Z).
Chronological order
- The arrangement in which events that occurred earlier would be placed before events that occurred later.
CLI
- Command Line Interface
- A user interface that allows users to interact with the software using text commands via a console or terminal.
GUI
- Graphical User Interface
- A user interface that allows users to interact with the software through graphical icons and visual indicators, as opposed to text-based interfaces.